• Which the release of FS2020 we see an explosition of activity on the forun and of course we are very happy to see this. But having all questions about FS2020 in one forum becomes a bit messy. So therefore we would like to ask you all to use the following guidelines when posting your questions:

    • Tag FS2020 specific questions with the MSFS2020 tag.
    • Questions about making 3D assets can be posted in the 3D asset design forum. Either post them in the subforum of the modelling tool you use or in the general forum if they are general.
    • Questions about aircraft design can be posted in the Aircraft design forum
    • Questions about airport design can be posted in the FS2020 airport design forum. Once airport development tools have been updated for FS2020 you can post tool speciifc questions in the subforums of those tools as well of course.
    • Questions about terrain design can be posted in the FS2020 terrain design forum.
    • Questions about SimConnect can be posted in the SimConnect forum.

    Any other question that is not specific to an aspect of development or tool can be posted in the General chat forum.

    By following these guidelines we make sure that the forums remain easy to read for everybody and also that the right people can find your post to answer it.

MSFS Porting and development of AT3-R100

Messages
79
Country
france
Hello,

With the agreement of berju83 author of the AT3-R100 for FSX and X-Plane (see FrenchVFR site) and also because I fly in real life with this aircraft at ACAF (Toussus-Le-Noble LFPN). I open this post to log my progress, my difficulties and my method to make an aircraft on MSFS 2020.


Messages
79
Country
france
Step 1: Prerequisites: the tools used

For the 3D model.
Blender (startup version 2.91) :
Blender plugin to export .gltf ASOBO : https://www.fsdeveloper.com/forum/resources/blender2msfs-toolkit.256/


For the textures
MSFS Export Preset: https://www.fsdeveloper.com/forum/resources/substance-painter-export-presets-for-msfs-2020.257/


Free alternatives for texturing
The last two are supported by EPIC Games

For the images
  • Photoshop
  • Gimp
 
Last edited:
Messages
79
Country
france
Step 2: Recovery of the 3D model
On the FrenchVFR website http://frenchvfr.free.fr/download.php?lng=fr&tconfig=0
Download the FSX version under menu FSX Aircraft / Aero Ldt. AT-3 R100

You install the aircraft in your FSX.

Conversion from .mdl to .obj
Via ModelConverterX V1.5 tool that manages .obj files.
I convert AT3-R100-HD.MDL and AT3-R100-HD_interior.MDL to .obj


Import in blender .obj with Geometry -> Split. Choose both by object and by group and Axis orientation : Y forward,


Separation and grouping of objects in Blender.
The goal of the game is to separate and group the 3D objects that will be assigned to a texture image.
For the moment, I have chosen the following groupings:
  • Fuselage fixed parts
  • Wings fixed parts
  • Exterior mobile moving part
  • Interior cockpit fixed part
  • Glass IN
  • Glass OUT
  • Gauges
  • Pilot
Remember to rename your objects as you go along.
 
Last edited:
Messages
79
Country
france
Step 3: Initializing the project in MSFS

Prerequisite: install the MSFS SDK sample tutorial
or

Copy the sample to a working directory: MSFS SDK\Samples\SimpleAircraft


  • rename this work directory SimpleAircraft, I chose AT3-FS.
  • rename the file SimpleAircraftProject.xml, I chose AT3FSAircraftProject.xml
    open the AT3FSAircraftProject.xml file and rename the elements in red
.
<Project Version="2" Name="AT3FSAircraftProject" FolderName="Packages"> (before SimpleAircraftProject)
<OutputDirectory>.</OutputDirectory>
<TemporaryOutputDirectory>_PackageInt</TemporaryOutputDirectory>
<Packages>
<Package>PackageDefinitions\ailgorbot-aircraft-at3fs.xml</Package> (before mycompany-aircraft-simple)
</Packages>
</Project>

  • rename PackageSources\SimObjects\Airplanes\MyCompany_Simple_Aircraft, I chose PackageSources\SimObjects\Airplanes\Ailgorbot_AT3FS_Aircraft
  • Go to this directory and open the file aircraft.cfg and modify the items in red
.

[VERSION]
major = 1
minor = 0

[GENERAL]
atc_type = "Aero LTD"
atc_model = "AT3FS"

Category = "airplane"
performance = ""
editable = 1
wip_indicator = 2
icao_type_designator = "MCAT3FS"
icao_manufacturer = "Aero LTD"
icao_model = "AT3-FS"

icao_engine_type = "Piston"
icao_engine_count = 1
icao_WTC = "L"

[EFFECTS]
wake = fx_wake
water = fx_spray
dirt = fx_tchdrt
concrete = fx_sparks
touchdown = fx_tchdwn_s, 1

[TIMELINE.FLIGHT_RUNWAY]
Flaps = 33

[LOADING]
ImageName = LOADING_FREEFLIGHT

[EXITS]
number_of_exits = 0

;===================== FLTSIM =====================

[FLTSIM.0]
title = "AT3-FS Aircraft ACAF" ; Variation name
model = "" ; model folder
panel = "" ; panel folder
sound = "" ; sound folder
texture = "" ; texture folder
kb_checklists = "" ; Procedures/Checklist sibling file name
kb_reference = "" ; Reference information sibling file name
description = "Sample plane for Air Traffic" ; Variation description.
wip_indicator = 0 ; know if the variation is good to go or still WIP : -1=Disabled, 0=Rough, 1=1st Pass, 2=Finished
ui_manufacturer = "Aero LTD" ; e.g. Boeing, Cessna
ui_type = "AT3-FS" ; e.g. 747-400, 172
ui_variation = "Default" ; e.g. World Air, IFR Panel
ui_typerole = "Single Engine Prop" ; e.g. Single Engine Prop, Twin Engine Prop, Rotorcraft, etc
ui_createdby = "ailgorbot" ; e.g. Asobo Studio, Microsoft, FSAddonCompany, etc
ui_thumbnailfile = "" ; app relative path to ThumbNail image file
ui_certified_ceiling = -1 ; service ceiling / max certified operating altitude (ft)
ui_max_range = -1 ; max distance the aircraft can fly between take-off and landing in (NM)
ui_autonomy = -1 ; max duration the aircraft can fly between take-off and landing in (Hrs)
ui_fuel_burn_rate = -1 ; average fuel consumption per hour (lbs/hr) - reminder: fuel density is ~6.7lbs per US gallon
atc_id = "F-PELI" ; tail number
atc_id_enable = 1 ; enable tail number
atc_airline = "" ; airline name
atc_flight_number = "" ; flight number
atc_heavy = 0 ; heavy?
atc_parking_types = "ANY" ; "ANY" / "RAMP" / "CARGO" / "MIL_CARGO" / "MIL_COMBAT" / "GATE" / "DOCK"
atc_parking_codes = "" ; Comma separated and may be as small as one character each
atc_id_color = "" ; color for the tail number : i.e. "#ffff00ff"
atc_id_font = "" ; font for the tail number
isAirTraffic = 1 ; airtraffic flag for variations
isUserSelectable = 0 ;

...
idem for [FLTSIM.1] et [FLTSIM.2]

  • Go to the PackageDefinitions directory.
  • rename the directory mycompany-aircraft-simple and the file mycompany-aircraft-simple.xml with the name you chose in SimpleAircraftProject.xml, I had chosen ailgorbot-aircraft-at3fs (this is the name of the package that will go in the Community directory)
  • open mycompany-aircraft-simple.xml (newly ailgorbot-aircraft-at3fs.xml) and modify the fields in red with the correct naming of directories and names (beware of case)
.


<AssetPackage Name="ailgorbot-aircraft-at3fs" Version="0.1.0">
<ItemSettings>
<ContentType>AIRCRAFT</ContentType>
<Title>AT3-R100</Title>
<Manufacturer>Aero LTD</Manufacturer>
<Creator>ailgorbot</Creator>
</ItemSettings>
<Flags>
<VisibleInStore>true</VisibleInStore>
<CanBeReferenced>true</CanBeReferenced>
</Flags>
<AssetGroups>
<AssetGroup Name="Ailgorbot_AT3FS_Aircraft">
<Type>SimObject</Type>
<Flags>
<FSXCompatibility>false</FSXCompatibility>
</Flags>
<AssetDir>PackageSources\SimObjects\Airplanes\Ailgorbot_AT3FS_Aircraft\</AssetDir>
<OutputDir>SimObjects\Airplanes\Ailgorbot_AT3FS_Aircraft\</OutputDir>
</AssetGroup>
<AssetGroup Name="ContentInfo">
<Type>Copy</Type>
<Flags>
<FSXCompatibility>false</FSXCompatibility>
</Flags>
<AssetDir>PackageDefinitions\ailgorbot-aircraft-at3fs\ContentInfo\</AssetDir>
<OutputDir>ContentInfo\ailgorbot-aircraft-at3fs\</OutputDir>
</AssetGroup>
<AssetGroup Name="MarketplaceData">
<Type>Copy</Type>
<Flags>
<FSXCompatibility>false</FSXCompatibility>
</Flags>
<AssetDir>PackageDefinitions\ailgorbot-aircraft-at3fs\MarketplaceData\</AssetDir>
<OutputDir>MarketplaceData\ailgorbot-aircraft-at3fs\</OutputDir>
</AssetGroup>
</AssetGroups>
</AssetPackage>

I don't touch Marketplace

  • Open MSFS and go into developer mode and open your project SimpleAircraftProject.xml, newly AT3FSAircraftProject.xml
.


  • Check that the field names and directories match your changes by clicking on Ailgorbot_AT3FS_Aircraft


and on ailgorbot-aircraft-at3fs


  • click on Build Package
  • check in the console (keyboard %) no fail
you may have this popup, don't worry about it.


PackageBuilder | Finished, 0 skipped, 62 done and 0 failed, took 24s525ms.
Warning: In my Community directory there is nothing, to avoid errors in the packages of other addons.

  • Load your aircraft in the editor by positioning on ailgorbot_AT3FS_Aircraft by clicking on load in editor
.


Aircraft editor window opens


Go to your hangar and you should see your plane appear and normally you can fly with it.


Messages
79
Country
france
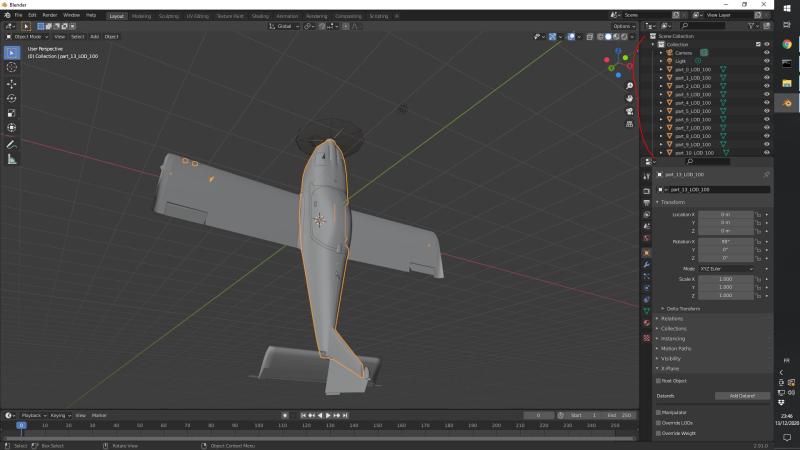
Step 4: Replacement test with the fuselage + texturing

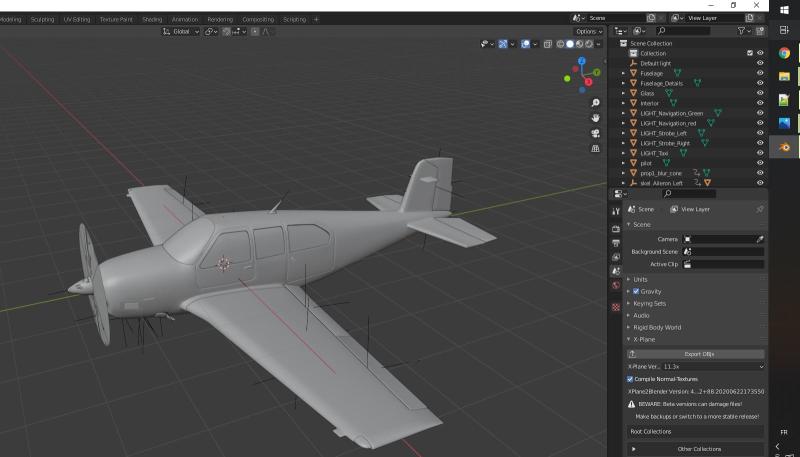
In Blender with the AT3-Fuselage collection which consists only of the fixed parts of the fuselage :

I assign for each object composing the fuselage, the same AT3-Fuselage material which is of the type MSFS Standard.
I compose the UV map


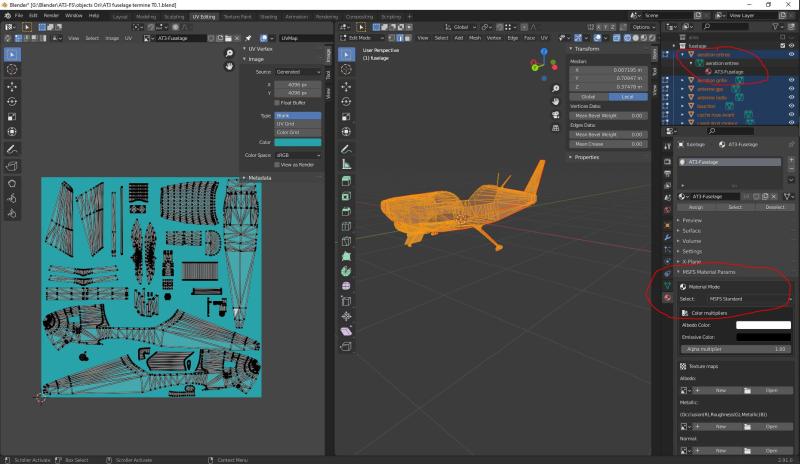
I export this object in 
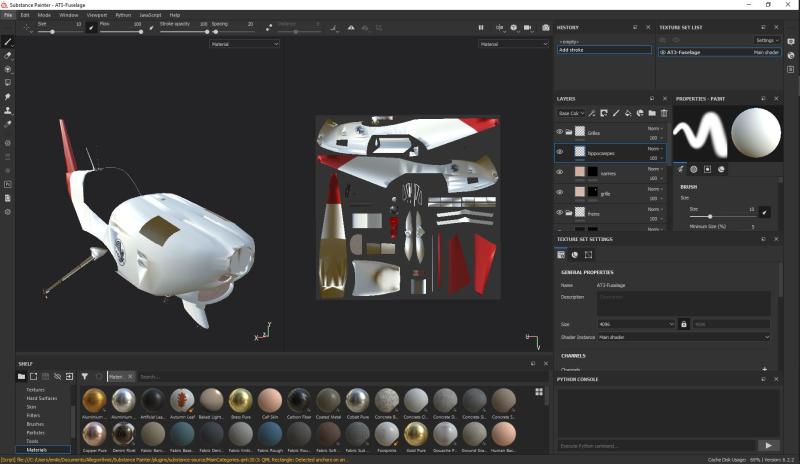
.fbx to texture it in substance painter and I texture it


I export the textures by choosing FS2020 with albedo alpha.


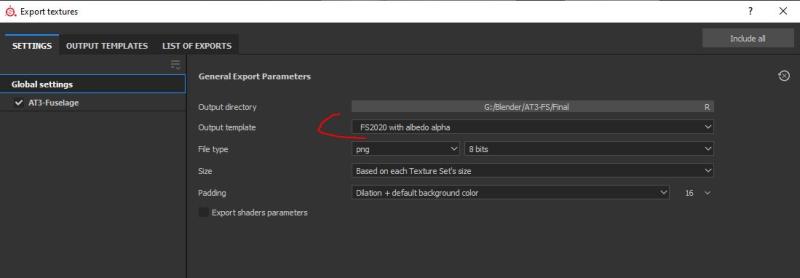
I get 3 .png albedo, metal and normal files that I copy in PackageSources\SimObjects\Airplanes\Ailgorbot_AT3FS_Aircraft\texture

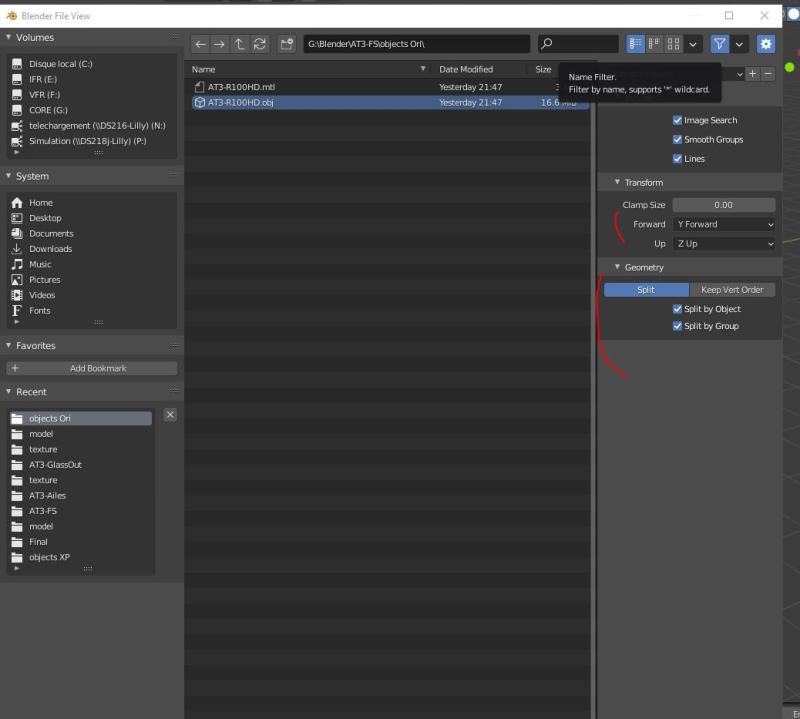
I come back in blender and import in a collection PackageSources\SimObjects\Airplanes\Ailgorbot_AT3FS_Aircraft\model\SimpleAircraft_LOD00.gltf
Unfortunately we lose the ASOBO properties like the textures.


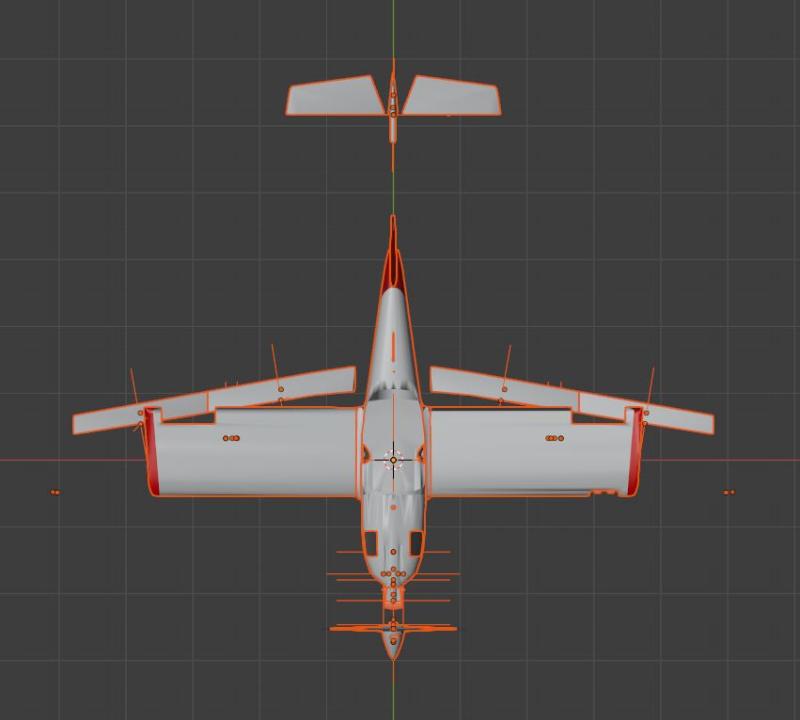
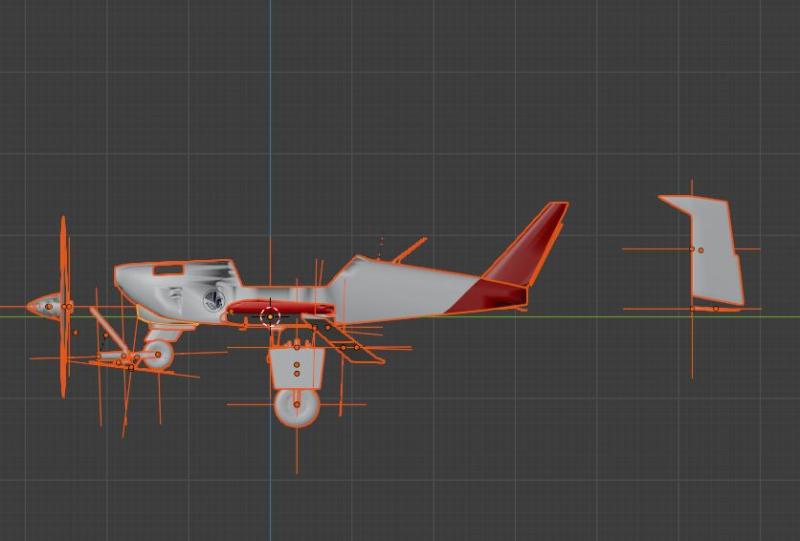
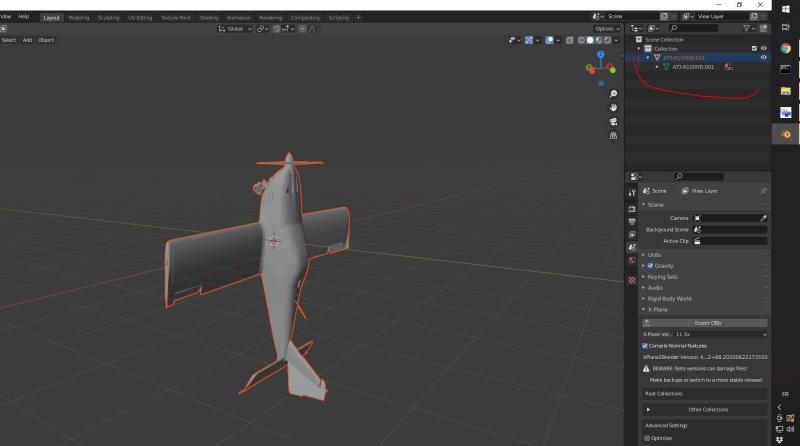
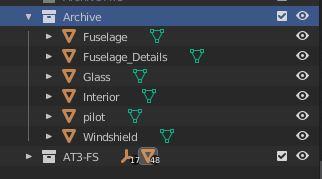
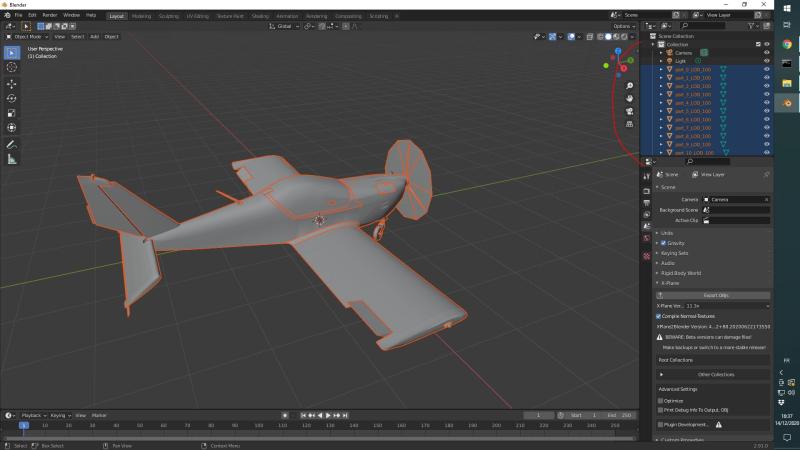
From the SimpleAircraft_LOD00 collection, I remove and set aside fuselage, windows, cockpit and pilot elements in an archive collection that I make invisible and disable.


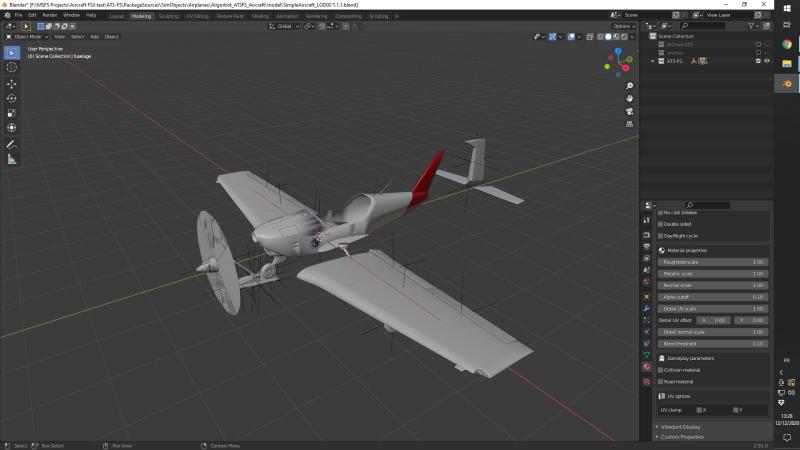
I add the AT3-Fuselage objects in the SimpleAircraft_LOD00 collection (which is named AT3-FS in my screenshot)


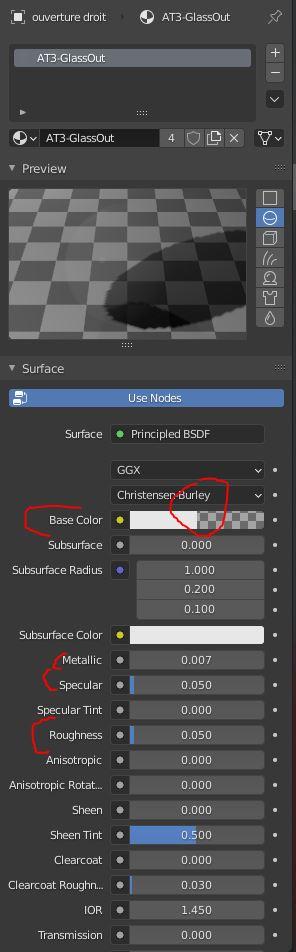
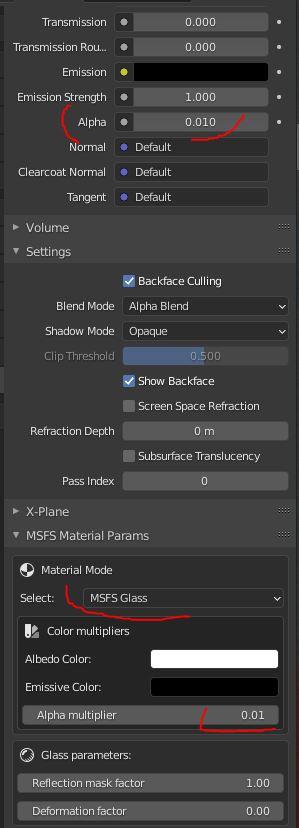
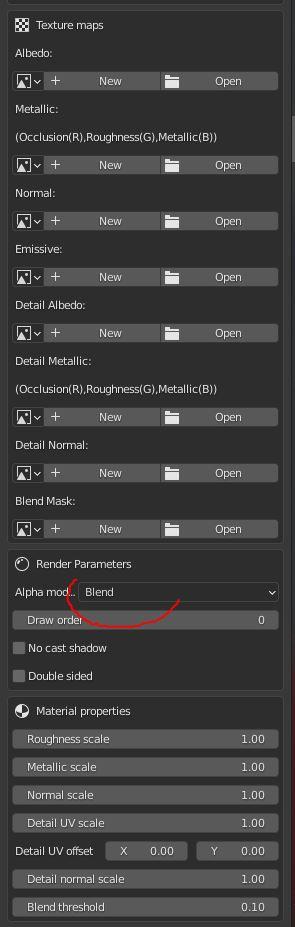
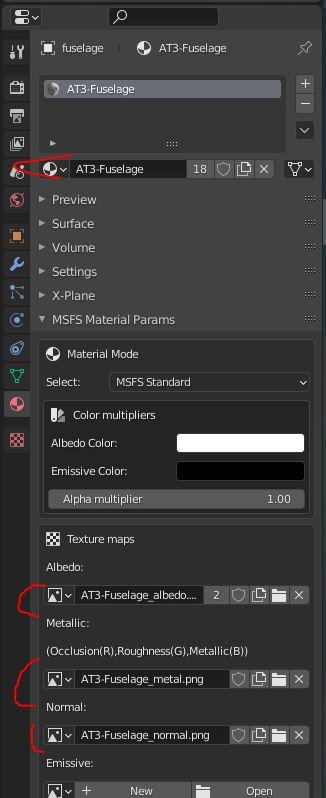
To have the textures I assign the 3 textures of the directory PackageSources\SimObjects\Airplanes\Ailgorbot_AT3FS_Aircraft\texture to the AT3-Fuselage material which is assigned to all the objects composing the AT3 fuselage.


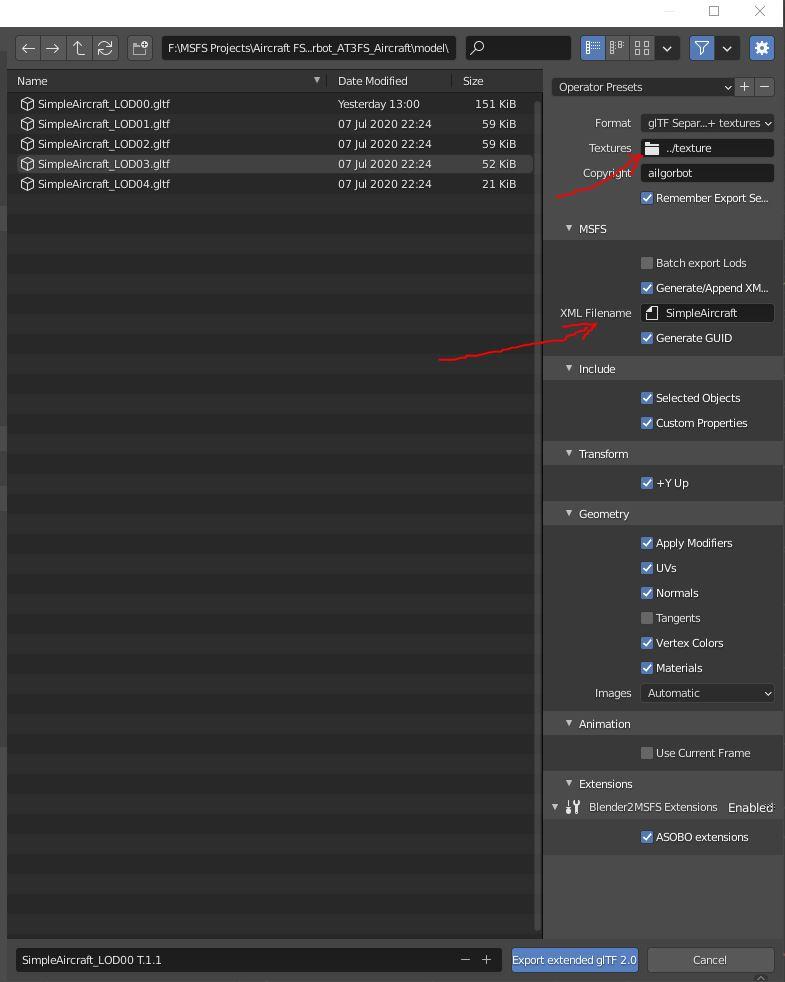
I select the complete aircraft, I export the SimpleAircraft_LOD00 collection (named AT3-FS in my screenshot) en .gltf extended with the options below replacing PackageSources\SimObjects\Airplanes\Ailgorbot_AT3FS_Aircraft\model\SimpleAircraft_LOD00.gltf


In the file PackageSources\SimObjects\Airplanes\Ailgorbot_AT3FS_Aircraft\model\SimpleAircraft.xml , you remove or put in remark the 4 red lines

<ModelInfo>

<LODS>
<!-- Highest LOD -->
<!-- minimum display size in % (should be bounding sphere vertical screen size, sphere will often be slightly larger than you expect) -->
<!-- default minSize is 0 -->
<LOD minSize="50" ModelFile="SimpleAircraft_LOD00.gltf"/>
<LOD minSize="20" ModelFile="SimpleAircraft_LOD01.gltf"/>
<LOD minSize="10" ModelFile="SimpleAircraft_LOD02.gltf"/>
<LOD minSize="5" ModelFile="SimpleAircraft_LOD03.gltf"/>
<LOD minSize="1" ModelFile="SimpleAircraft_LOD04.gltf"/>

</LODS>

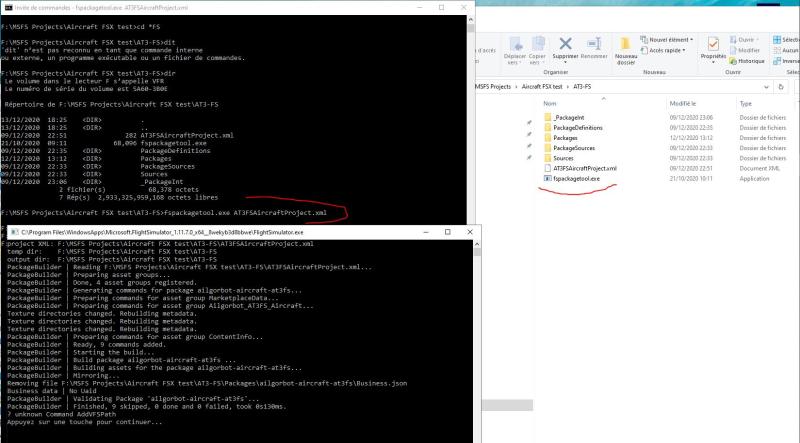
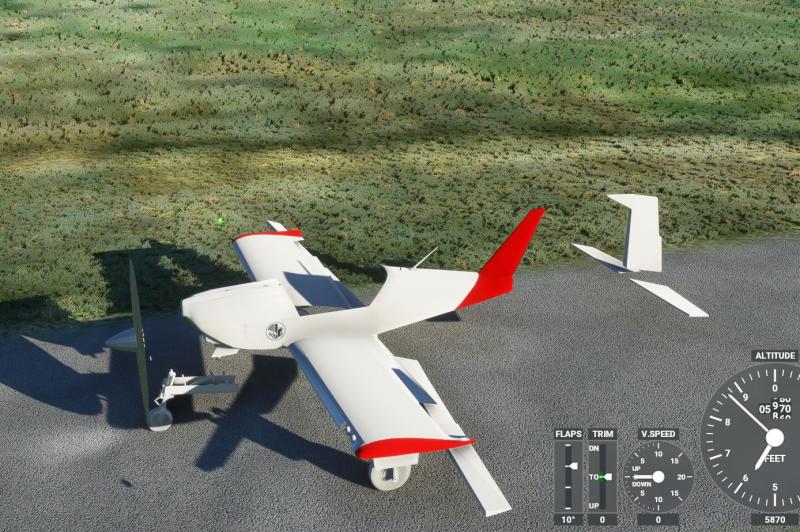
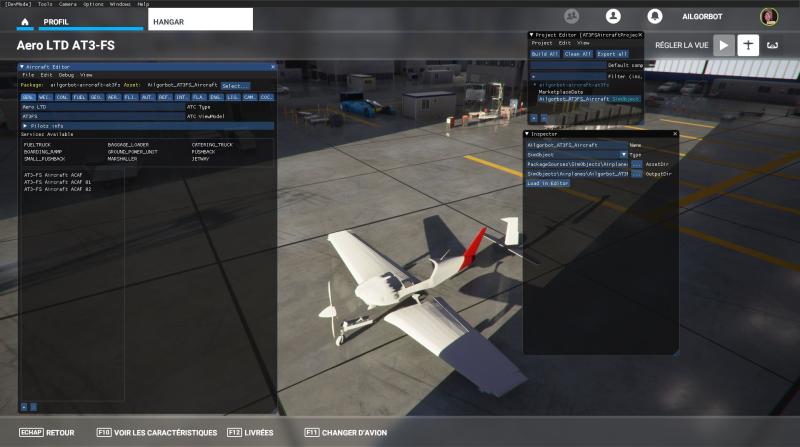
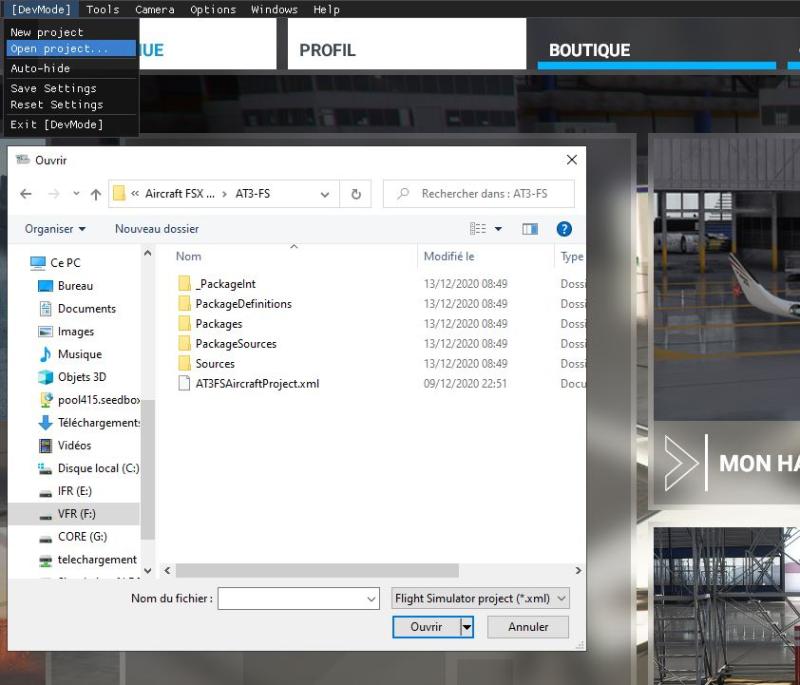
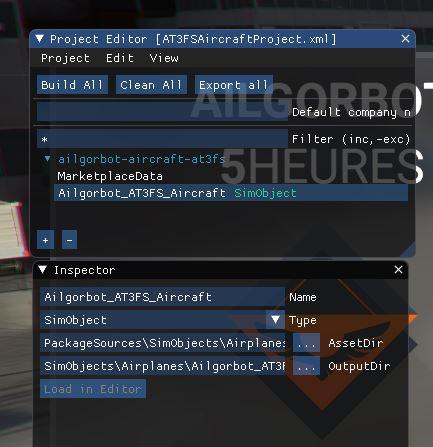
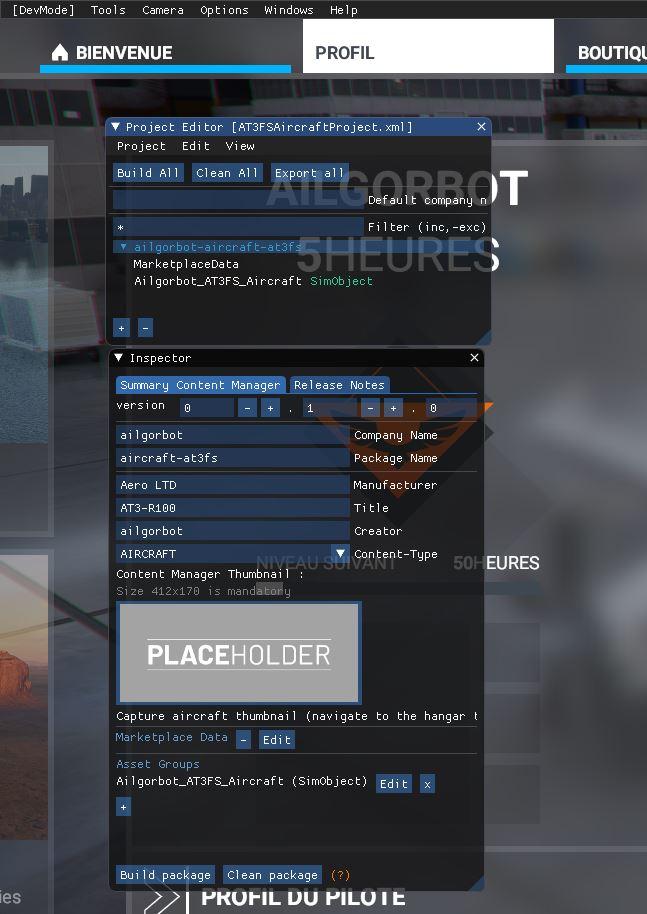
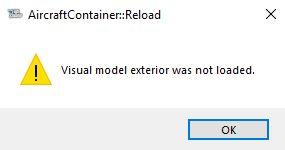
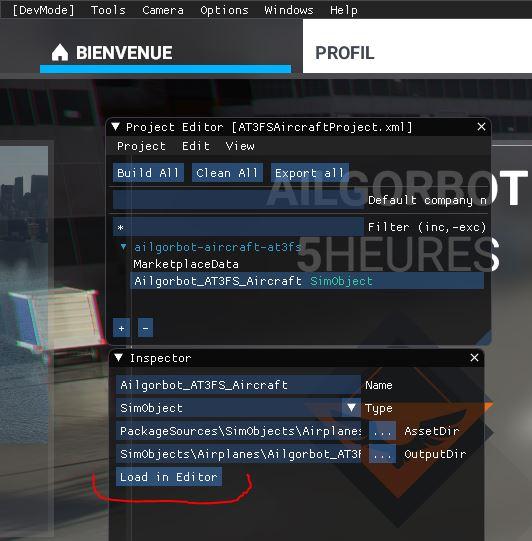
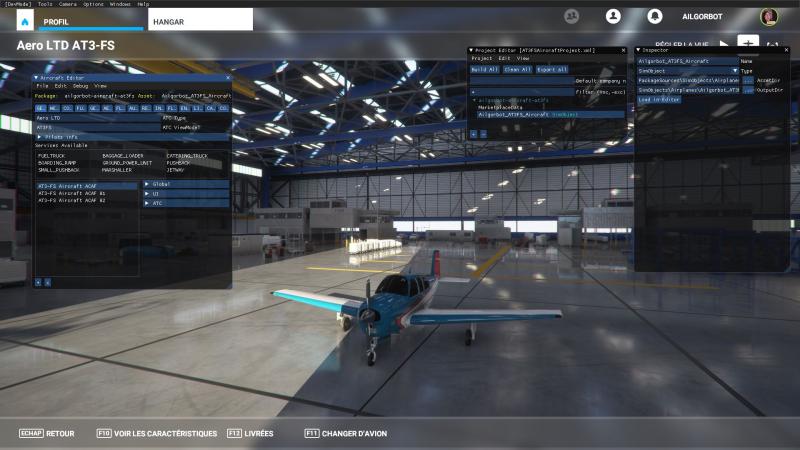
You reopen your project in MSFS in developer mod


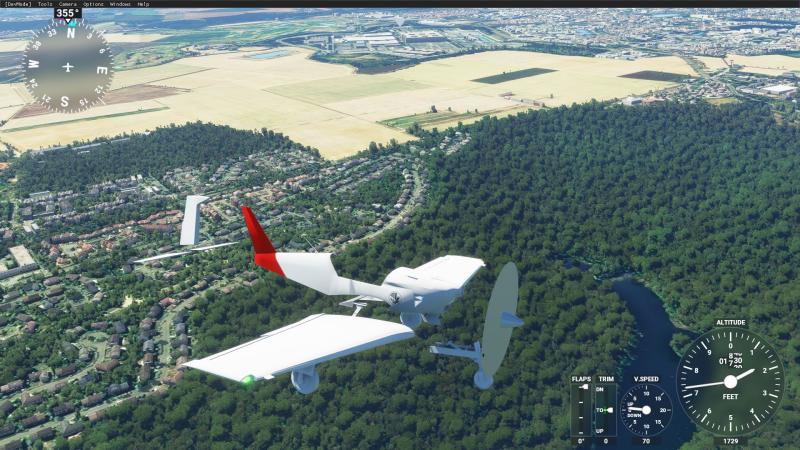
It must fly. We can see that the other elements of the plane have lost ASOBO properties such as texture.


Lagaffe

Resource contributor
Messages
864
Country
france
Hi,
Good idea to illustrate your work.
Since I'm doing the same for my three Cessna 150s, this may be an opportunity to make a modest contribution.

Just two remarks,
- On step 3 in the first directory which contains AT3FSAircraftProject.xml you can put a copy of fspackagetool.exe (what you can find in the SDK) and make a drag and drop of AT3FSAircraftProject.xml on fspackagetool.exe. As this you don't need to launch MSFS application.
This action launch the compilation in a MS-DOS windows and after some instant a second MS-DOS Windows list all the informations which appears normally on the DEV Mode Console. I have take this process since my first try and it seems to be more convenient just to read the error messages.
- On step 4, when you add the AT3-Fuselage objects in the SimpleAircraft_LOD00 collection, I think you should take in account the Centrer of Gravity of your import plane and put it at the same position that the CofG of the SimpleAircraft : the point (0;0;0) of Blender shoud be at the same position that the CofG defined by Berju for his AT3.

PS: I have a lot a pleasure to see that this Berju's aircraft can continue to live. As I write as webmaster of French-VFR, I would be very honored to host it (if you want) as it was the case for the first versions.
 
Last edited:
Messages
79
Country
france
Hi Lagaffe,

Thanks for your reply
As I said to Bernard, I have plan to ask admin (I kown it's you now ;)) to host this aircraft in FrenchVFR website in order to be close the others versions(FSX and X-Plane)

Step 3 :
Using MSFS SDK\Tools\bin\fspackagetool.exe is a great idea


Step 4 : When I add wings I saw i have made a mistake about center of gravity.

 
Messages
141
Country
peru
Hello!

A hint: I find it is better to export the MDL from MCX as OBJ. Your animations are not thrown out of place. At present, you need to reanimate them in blender anyway....
 

Lagaffe

Resource contributor
Messages
864
Country
france
Not a problem for hosting yours files.
For the story, Bernard and I worked in the same company but on two different sites and we didn't know this until after Bernard retired.

For the CofG, it is most of the time located on the 1/3 of the "string" (cf. https://fr.wikipedia.org/wiki/Corde_(aérodynamique).
For the little that I have studied Asobo's planes, it seems that this aerodynamic principle is not often respected.

PS: As for flight models, what I know was taught to me by BeeGee and Epsilon (two members of Pilote-Virtuel).
 
Messages
79
Country
france
Hello!

A hint: I find it is better to export the MDL from MCX as OBJ. Your animations are not thrown out of place. At present, you need to reanimate them in blender anyway....
Hi,
The issue by exporting as OBJ (Wavefront), MCX have created one object with multiple texture. Maybe there is a trick or option to separate object and keep animation in MCX ?

 
Messages
141
Country
peru
Hi,
The issue by exporting as OBJ (Wavefront), MCX have created one object with multiple texture. Maybe there is a trick or option to separate object and keep animation in MCX ?
You cannot keep animations (yet) to my knowledge. To split, you have to choose the option when importing in blender. Geometry -> Split. Choose both by object and by group. The options are located on the right hand side of the import window. This is what I have done when importing my own models.
Plus, it is possible to apply multiple textures to a single object in Blender, although is a bit complicated. You have to apply multiple materials to it, and assign the materials to polygon selections. Anyway, the above selection shall split the object into parts with single textures.
 
Messages
79
Country
france
Etape 6 : Glass out

Nice tutorial :

For the glass, you must use Material Mode : MSFS Glass
below an example of options,
It's up to you to play with the different parameters. Be careful, there are 3 alpha parameters (base color, above emission strenght and alpha multiplier) that must be set low, otherwise the glass will be opaque.


Messages
79
Country
france
You cannot keep animations (yet) to my knowledge. To split, you have to choose the option when importing in blender. Geometry -> Split. Choose both by object and by group. The options are located on the right hand side of the import window. This is what I have done when importing my own models.
Plus, it is possible to apply multiple textures to a single object in Blender, although is a bit complicated. You have to apply multiple materials to it, and assign the materials to polygon selections. Anyway, the above selection shall split the object into parts with single textures.
Great that's working realy fine. 👍 I am going to use your import approach for the rest of the plane. Thanks for tips. (I have updated the post above)

 
Last edited:

Lagaffe

Resource contributor
Messages
864
Country
france
Hi,
An other option in thoses described by Mariopilot IS to modified Axis orientation : Y forward, I think should solve the fact that your plane is "stand up".
 
Last edited:
Messages
35
Country
italy
Step 2: Recovery of the 3D model
On the FrenchVFR website http://frenchvfr.free.fr/download.php?lng=fr&tconfig=0
Download the FSX version under menu FSX Aircraft / Aero Ldt. AT-3 R100

You install the aircraft in your FSX.

Conversion from .mdl to .obj
Via ModelConverterX V1.5 tool that manages .obj files.
I convert AT3-R100-HD.MDL and AT3-R100-HD_interior.MDL to .obj


Import in blender .obj with Geometry -> Split. Choose both by object and by group.


Separation and grouping of objects in Blender.
The goal of the game is to separate and group the 3D objects that will be assigned to a texture image.
For the moment, I have chosen the following groupings:
  • Fuselage fixed parts
  • Wings fixed parts
  • Exterior mobile moving part
  • Interior cockpit fixed part
  • Glass IN
  • Glass OUT
  • Gauges
  • Pilot
Remember to rename your objects as you go along.
Is the animation work ?
 

Lagaffe

Resource contributor
Messages
864
Country
france
Sorry,

Animations to glTF are not supported actually by MCX so ... converting a MDL to OBJ or FBX lost ALL animations (information given at the top of this topic)
 
Top