- Messages
- 1,510
- Country
-

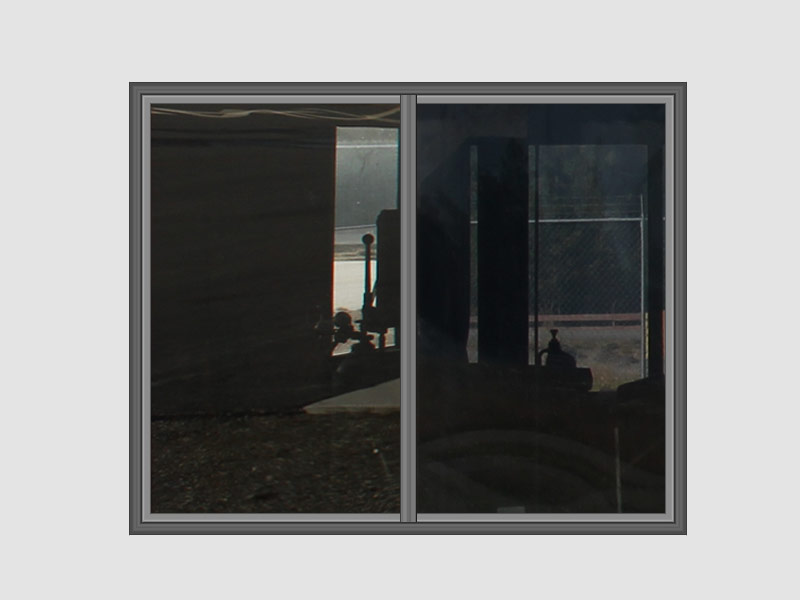
I think if I had to choose just one PhotoShop trick that I felt like I should share it would be this. Maybe everyone does this but I don't recall ever having seen it before and I derived it myself rather than picking it up from a tutorial or something. I use it a lot, in this example we'll make a window frame but it can be adapted to almost anything as long as the surface you're trying to depict is uniform.
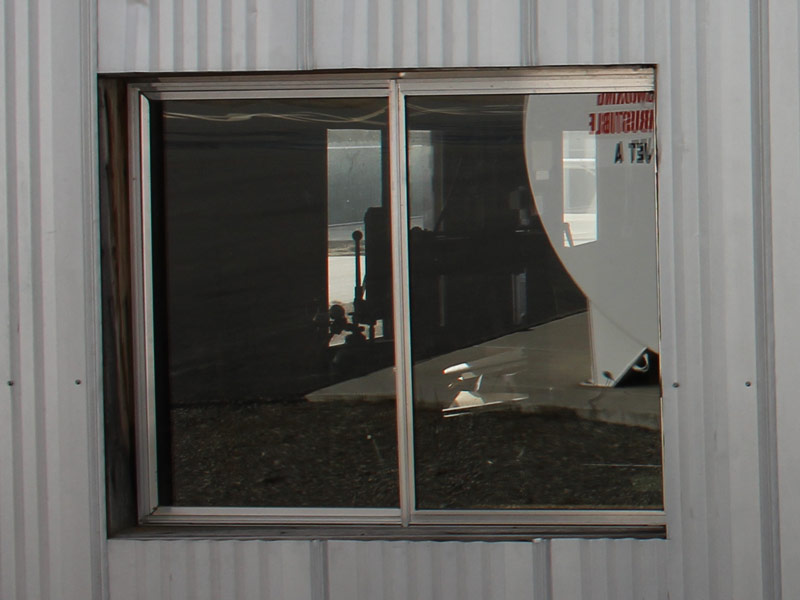
Say we need to make this window but as you can see the photographer didn't do so well and we can't even see the aluminum frame on the right hand side - you buy 'em books and send 'em to school... (Yes, I took the photo myself). Here's a trick I use a lot to manufacture what I need by "extruding pixels". Sure, you could mess around trying to straighten up the window, then you could select and copy the left frame section, flip it horizontally and probably come up with a plausible right hand framework, but to me this is quicker, easier, and results in a more square and accurate window frame with more uniform coloration.
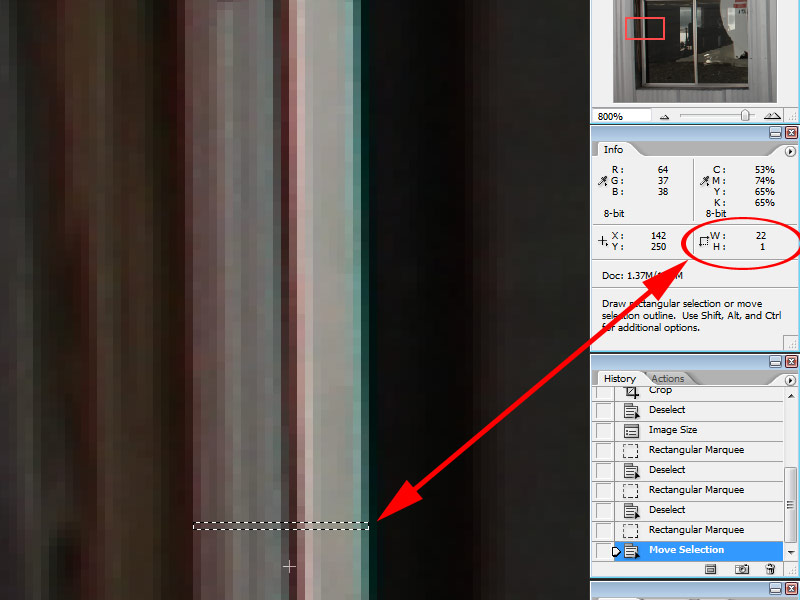
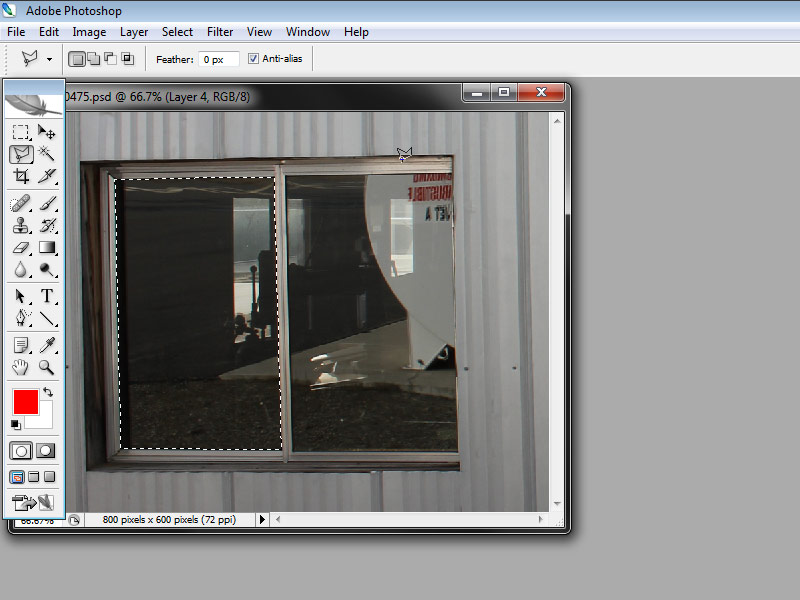
Find a spot on the left hand frame that you like and make a selection the width of the framework and exactly 1px high. The 1px height is important, we're going to "extrude" a chunk of this photo and if the selection is 2px high you'll see some smearing of pixels that will probably give you an undesirable result. Note the info panel on the right gives you the dimensions of your selection, this can be very handy if you're trying to make a 1px high selection across the width of a hangar or something where you'll need to be zoomed out much more than in this example therefore making it difficult to determine if you've got 1px or 2 or 3, etc.
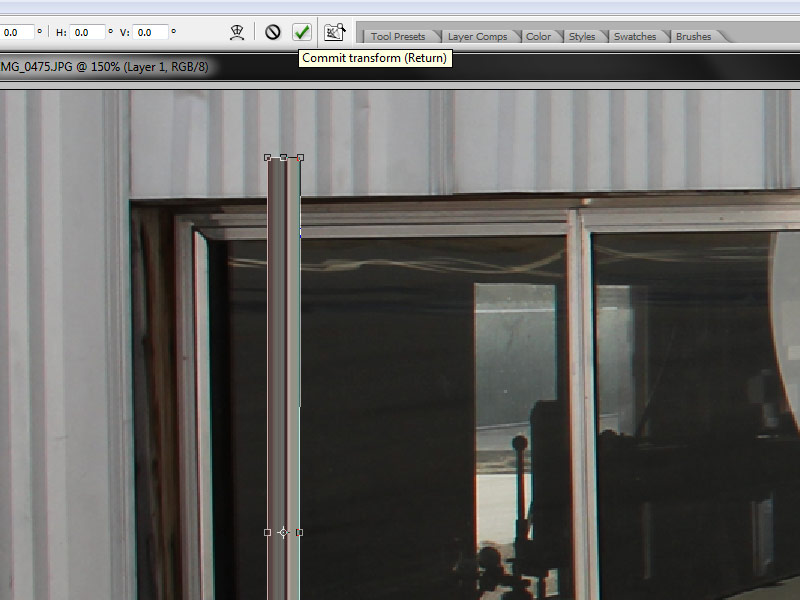
Press Ctrl+C followed by Ctrl+V to copy & paste the tiny section of framework as a new layer overtop of the background. Now press V to go into "Move" mode and click on the edge of the layer boundary to put yourself in free transform mode. Stretch the pasted piece out vertically, grab the upper boundary and drag it upwards slightly beyond the height of the window, grab the lower boundary and drag it downwards slightly beyond the lower edge of the window. Hit the little check mark icon above to commit the transform. Now you have a nice straight chunk of aluminum framework to work with. Do Image > Adjustments > Desaturate to remove the ugly brown color and make it look like aluminum. We can lay a semi-transparent color fill layer overtop if we decide we need to put some color back into it later on.
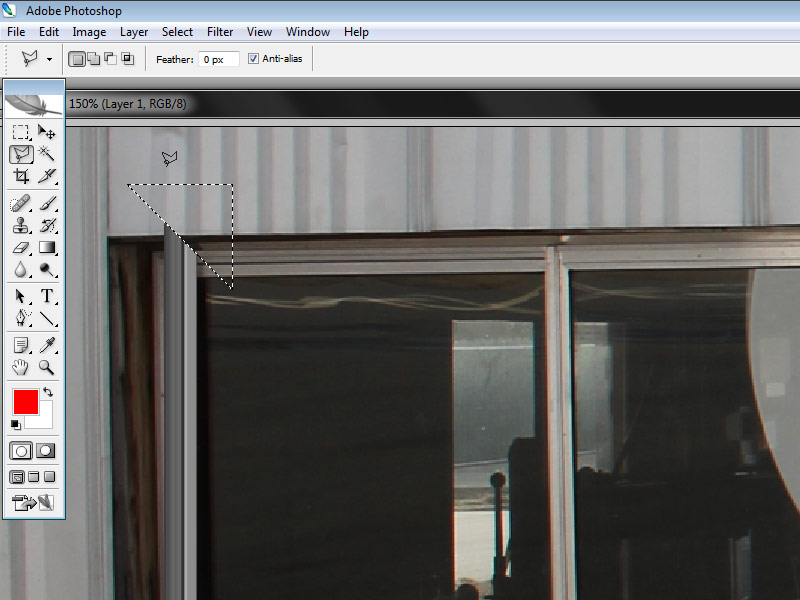
Now we need to miter the corners so press L for lasso tool, set feather to "0" and turn anti-aliasing on. Click just outside and above the window frame to start the selection, hold down the shift key to constrain the first segment of the selection to 45°, click around in a triangular pattern and finalize the selection by clicking back on the point where you started. You can nudge the selection around with your arrow keys, align it with the miter in the actual window frame and press "Del" to clear away the excess. Repeat the process for the bottom, mitering in the opposite direction this time.
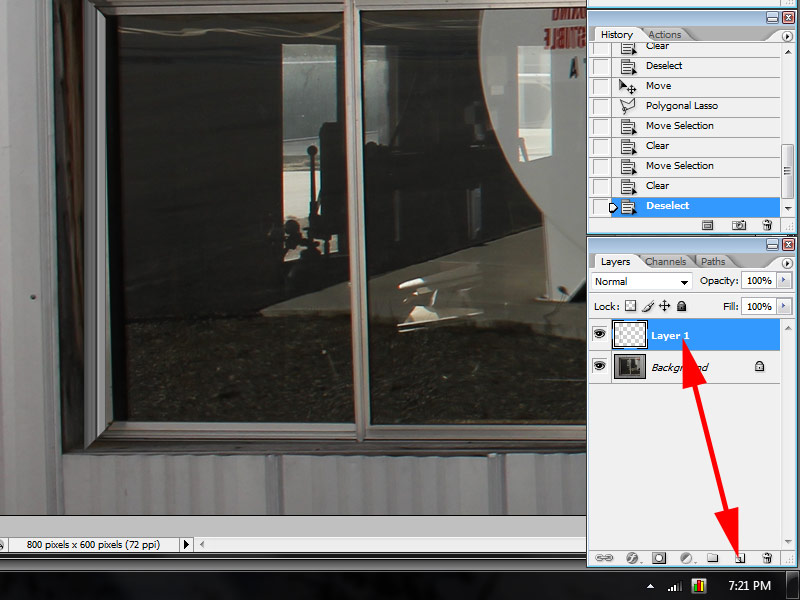
Duplicate the layer in the layers palette by dragging it downwards and dropping it onto the "Create new layer" icon as shown by the arrows. Do Edit > Transform > Flip Horizontal and now you have a framework for the right hand side. Press Ctrl+Shift+ Right arrow key to nudge the new layer horizontally 10px at a time to the right side of the window, press Ctrl+Right arrow to nudge the layer only 1px at a time.
Duplicate the left hand framework again, do Edit > Transform > Rotate 90° CCW, this becomes the top framework, drag it down just above the background image in the layers palette so that it appears behind the two vertical ends you made above, nudge it into position at the top of the framework and then do free transform on it, this time stretching it horizontally just beyond the two vertical uprights. Press "M" for rectangular marquee and draw a selection box on the left end at the outer edge of the vertical rail, press Del to trim it off flush. Repeat for the right edge. Duplicate the top framework, flip it vertically, and nudge it into position at the bottom of the window. For the center section repeat the first step above by copying a 1px chunk of the center upright from the background image and stretching it vertically between the top & bottom rails, desaturate and trim as necessary.
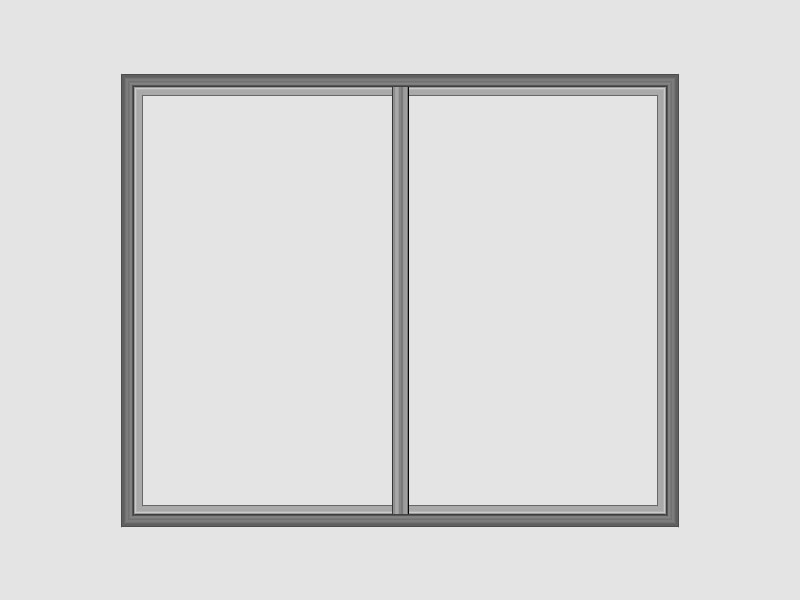
Now select all the layers above the background image in the layers palette by clicking the top layer and holding the shift key down while clicking the bottom layer (first layer above the background), press Ctrl+E to merge all the layers into one. Play around with brightness & contrast a bit if you feel it's necessary, I lightened this somewhat and cranked up the contrast a tiny bit. You should end up with something like this:
Now we need some glass. Here I'll also show a trick I use to straighten up photos that suffer from some perspective distortion. First grab the lasso tool again, same settings, zero feather and anti-aliasing on, select around the perimeter of the glass panel in the background. Copy that from the background and paste as a new layer.
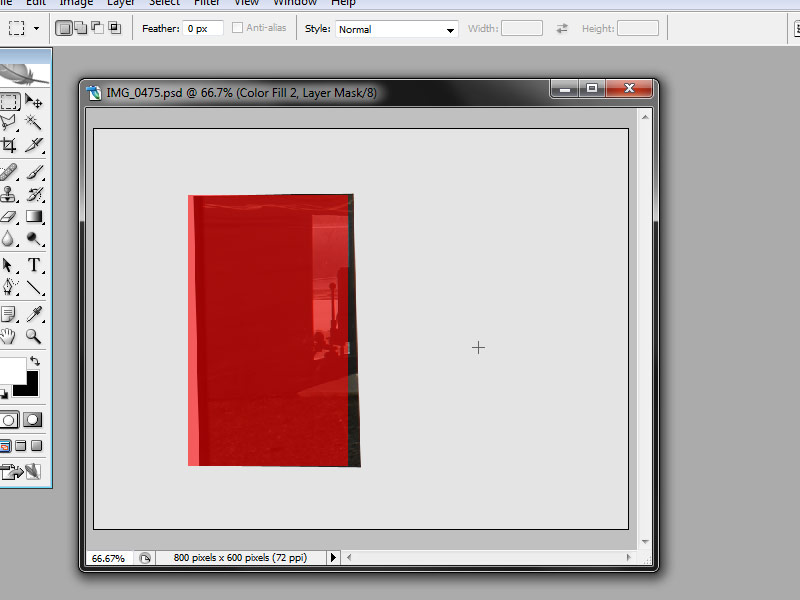
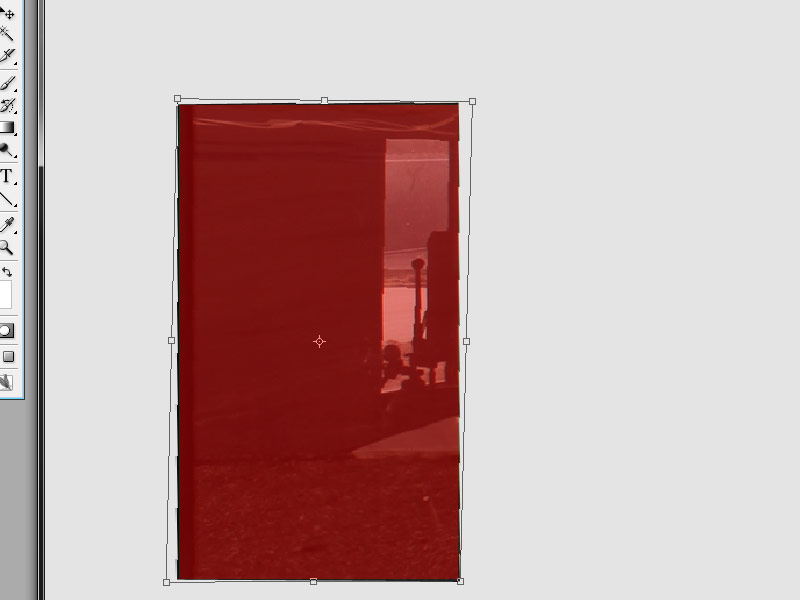
Turn all the layers off in the layers palette so you see only the pasted glass layer. With the rectangular marquee tool select a rectangular area that approximates the size and shape of the glass layer, then do Layer > New color fill layer and set the opacity of the new layer to 40%. I use red but whatever makes it visible is fine. Note the distortion of the glass layer in comparison to the new color fill layer.
Select the glass layer in the layers palette and then do Edit > Transform > Distort. Drag the corners of the bounding box individually to stretch the glass so that each edge extends just beyond the edges of the red color fill layer, commit the transform. Switch back to the marquee tool and click the red color fill layer's icon in the layers palette while holding the Ctrl key down to load it's selection. Press Ctrl+shift+I to invert the selection. Select the glass layer again in the layers palette if it's not already selected and press Del. The glass is now straight. Drag the red color fill layer down to the little garbage can icon in the layers palette to delete it.
Position the glass behind the framework from the steps above, use free transform if necessary to stretch it into place so the framework overlaps it all the way around. I didn't care for the glass from the right hand pane in the background image so I borrowed another piece of glass from another photo for the right. I merged the frame and the two pieces of glass into a single layer as described above.
To finish it off I made a 1px high selection on the tin in the background image and extruded it vertically just as I'd done with the window frame. I loaded the window's selection and cut a hole in the tin layer and then set the tin above the window in the layers palette. I added a heavy drop shadow to the tin overlaying the window to make the window look sunken into the wall a bit. I added a bit of noise to the tin layer. I made the outer frame above the tin by extruding pixels and mitering the corners as described above. I added a faint black outer glow to the two horizontal components to make the miters somewhat visible and then merged the four outer frame components together. I laid a faint pattern fill layer set to "multiply" over the outer frame to give it some irregularity. Finally I added another black outer glow to the entire outer frame to set it off from the tin just a bit.
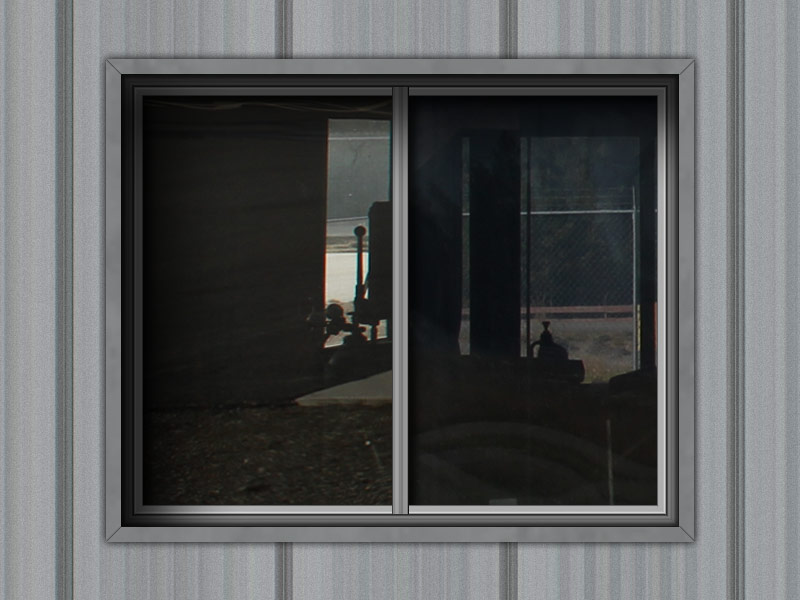
As you can see it's possible to make a fairly nice texture from a fairly lousy photo with this technique. The final image has been completely synthesized with the exception of the glass panels. Use the technique to synthesize an entire tin wall, desaturate that and lay a color fill layer overtop set to "multiply" to give the tin a uniform color, the color is then easily adjusted or even changed completely by simply adjusting the color fill layer. I find the straightness and squareness that results from extruding things vertically and horizontally adds a lot to my models over trying to straighten photos and use them directly, in the end there's always some distortion somewhere in the texture which takes away from the model somewhat IMHO.
Jim
Say we need to make this window but as you can see the photographer didn't do so well and we can't even see the aluminum frame on the right hand side - you buy 'em books and send 'em to school... (Yes, I took the photo myself). Here's a trick I use a lot to manufacture what I need by "extruding pixels". Sure, you could mess around trying to straighten up the window, then you could select and copy the left frame section, flip it horizontally and probably come up with a plausible right hand framework, but to me this is quicker, easier, and results in a more square and accurate window frame with more uniform coloration.
Find a spot on the left hand frame that you like and make a selection the width of the framework and exactly 1px high. The 1px height is important, we're going to "extrude" a chunk of this photo and if the selection is 2px high you'll see some smearing of pixels that will probably give you an undesirable result. Note the info panel on the right gives you the dimensions of your selection, this can be very handy if you're trying to make a 1px high selection across the width of a hangar or something where you'll need to be zoomed out much more than in this example therefore making it difficult to determine if you've got 1px or 2 or 3, etc.
Press Ctrl+C followed by Ctrl+V to copy & paste the tiny section of framework as a new layer overtop of the background. Now press V to go into "Move" mode and click on the edge of the layer boundary to put yourself in free transform mode. Stretch the pasted piece out vertically, grab the upper boundary and drag it upwards slightly beyond the height of the window, grab the lower boundary and drag it downwards slightly beyond the lower edge of the window. Hit the little check mark icon above to commit the transform. Now you have a nice straight chunk of aluminum framework to work with. Do Image > Adjustments > Desaturate to remove the ugly brown color and make it look like aluminum. We can lay a semi-transparent color fill layer overtop if we decide we need to put some color back into it later on.
Now we need to miter the corners so press L for lasso tool, set feather to "0" and turn anti-aliasing on. Click just outside and above the window frame to start the selection, hold down the shift key to constrain the first segment of the selection to 45°, click around in a triangular pattern and finalize the selection by clicking back on the point where you started. You can nudge the selection around with your arrow keys, align it with the miter in the actual window frame and press "Del" to clear away the excess. Repeat the process for the bottom, mitering in the opposite direction this time.
Duplicate the layer in the layers palette by dragging it downwards and dropping it onto the "Create new layer" icon as shown by the arrows. Do Edit > Transform > Flip Horizontal and now you have a framework for the right hand side. Press Ctrl+Shift+ Right arrow key to nudge the new layer horizontally 10px at a time to the right side of the window, press Ctrl+Right arrow to nudge the layer only 1px at a time.
Duplicate the left hand framework again, do Edit > Transform > Rotate 90° CCW, this becomes the top framework, drag it down just above the background image in the layers palette so that it appears behind the two vertical ends you made above, nudge it into position at the top of the framework and then do free transform on it, this time stretching it horizontally just beyond the two vertical uprights. Press "M" for rectangular marquee and draw a selection box on the left end at the outer edge of the vertical rail, press Del to trim it off flush. Repeat for the right edge. Duplicate the top framework, flip it vertically, and nudge it into position at the bottom of the window. For the center section repeat the first step above by copying a 1px chunk of the center upright from the background image and stretching it vertically between the top & bottom rails, desaturate and trim as necessary.
Now select all the layers above the background image in the layers palette by clicking the top layer and holding the shift key down while clicking the bottom layer (first layer above the background), press Ctrl+E to merge all the layers into one. Play around with brightness & contrast a bit if you feel it's necessary, I lightened this somewhat and cranked up the contrast a tiny bit. You should end up with something like this:
Now we need some glass. Here I'll also show a trick I use to straighten up photos that suffer from some perspective distortion. First grab the lasso tool again, same settings, zero feather and anti-aliasing on, select around the perimeter of the glass panel in the background. Copy that from the background and paste as a new layer.
Turn all the layers off in the layers palette so you see only the pasted glass layer. With the rectangular marquee tool select a rectangular area that approximates the size and shape of the glass layer, then do Layer > New color fill layer and set the opacity of the new layer to 40%. I use red but whatever makes it visible is fine. Note the distortion of the glass layer in comparison to the new color fill layer.
Select the glass layer in the layers palette and then do Edit > Transform > Distort. Drag the corners of the bounding box individually to stretch the glass so that each edge extends just beyond the edges of the red color fill layer, commit the transform. Switch back to the marquee tool and click the red color fill layer's icon in the layers palette while holding the Ctrl key down to load it's selection. Press Ctrl+shift+I to invert the selection. Select the glass layer again in the layers palette if it's not already selected and press Del. The glass is now straight. Drag the red color fill layer down to the little garbage can icon in the layers palette to delete it.
Position the glass behind the framework from the steps above, use free transform if necessary to stretch it into place so the framework overlaps it all the way around. I didn't care for the glass from the right hand pane in the background image so I borrowed another piece of glass from another photo for the right. I merged the frame and the two pieces of glass into a single layer as described above.
To finish it off I made a 1px high selection on the tin in the background image and extruded it vertically just as I'd done with the window frame. I loaded the window's selection and cut a hole in the tin layer and then set the tin above the window in the layers palette. I added a heavy drop shadow to the tin overlaying the window to make the window look sunken into the wall a bit. I added a bit of noise to the tin layer. I made the outer frame above the tin by extruding pixels and mitering the corners as described above. I added a faint black outer glow to the two horizontal components to make the miters somewhat visible and then merged the four outer frame components together. I laid a faint pattern fill layer set to "multiply" over the outer frame to give it some irregularity. Finally I added another black outer glow to the entire outer frame to set it off from the tin just a bit.
As you can see it's possible to make a fairly nice texture from a fairly lousy photo with this technique. The final image has been completely synthesized with the exception of the glass panels. Use the technique to synthesize an entire tin wall, desaturate that and lay a color fill layer overtop set to "multiply" to give the tin a uniform color, the color is then easily adjusted or even changed completely by simply adjusting the color fill layer. I find the straightness and squareness that results from extruding things vertically and horizontally adds a lot to my models over trying to straighten photos and use them directly, in the end there's always some distortion somewhere in the texture which takes away from the model somewhat IMHO.
Jim
Last edited:


")
