
• Which the release of FS2020 we see an explosition of activity on the forun and of course we are very happy to see this. But having all questions about FS2020 in one forum becomes a bit messy. So therefore we would like to ask you all to use the following guidelines when posting your questions:

    • Tag FS2020 specific questions with the MSFS2020 tag.
    • Questions about making 3D assets can be posted in the 3D asset design forum. Either post them in the subforum of the modelling tool you use or in the general forum if they are general.
    • Questions about aircraft design can be posted in the Aircraft design forum
    • Questions about airport design can be posted in the FS2020 airport design forum. Once airport development tools have been updated for FS2020 you can post tool speciifc questions in the subforums of those tools as well of course.
    • Questions about terrain design can be posted in the FS2020 terrain design forum.
    • Questions about SimConnect can be posted in the SimConnect forum.

    Any other question that is not specific to an aspect of development or tool can be posted in the General chat forum.

    By following these guidelines we make sure that the forums remain easy to read for everybody and also that the right people can find your post to answer it.

3ds max texture with transparency

Messages
145
Country
germany
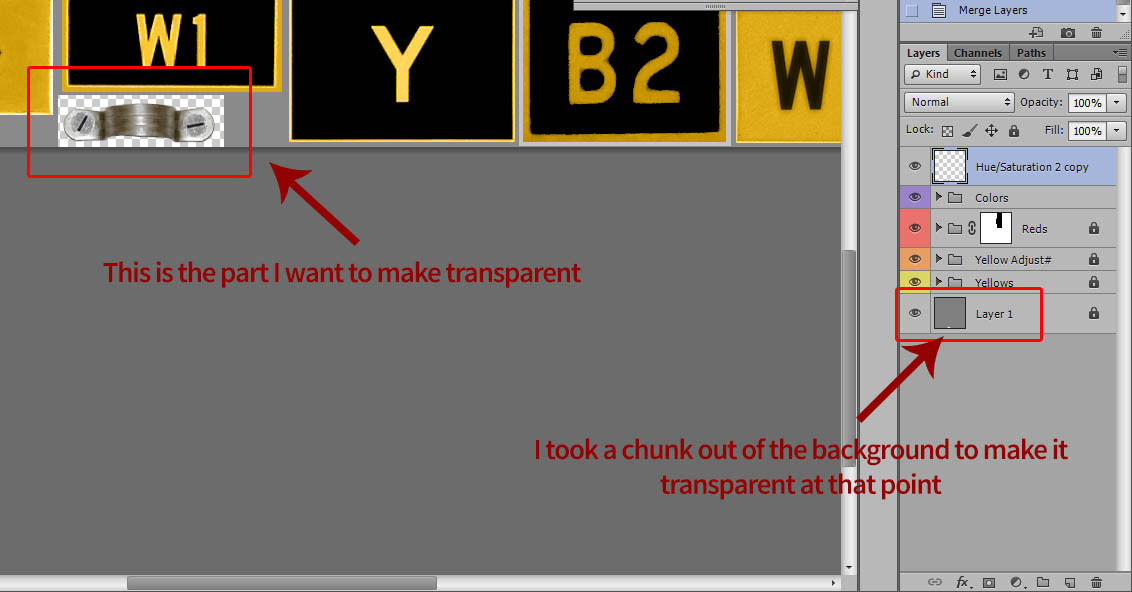
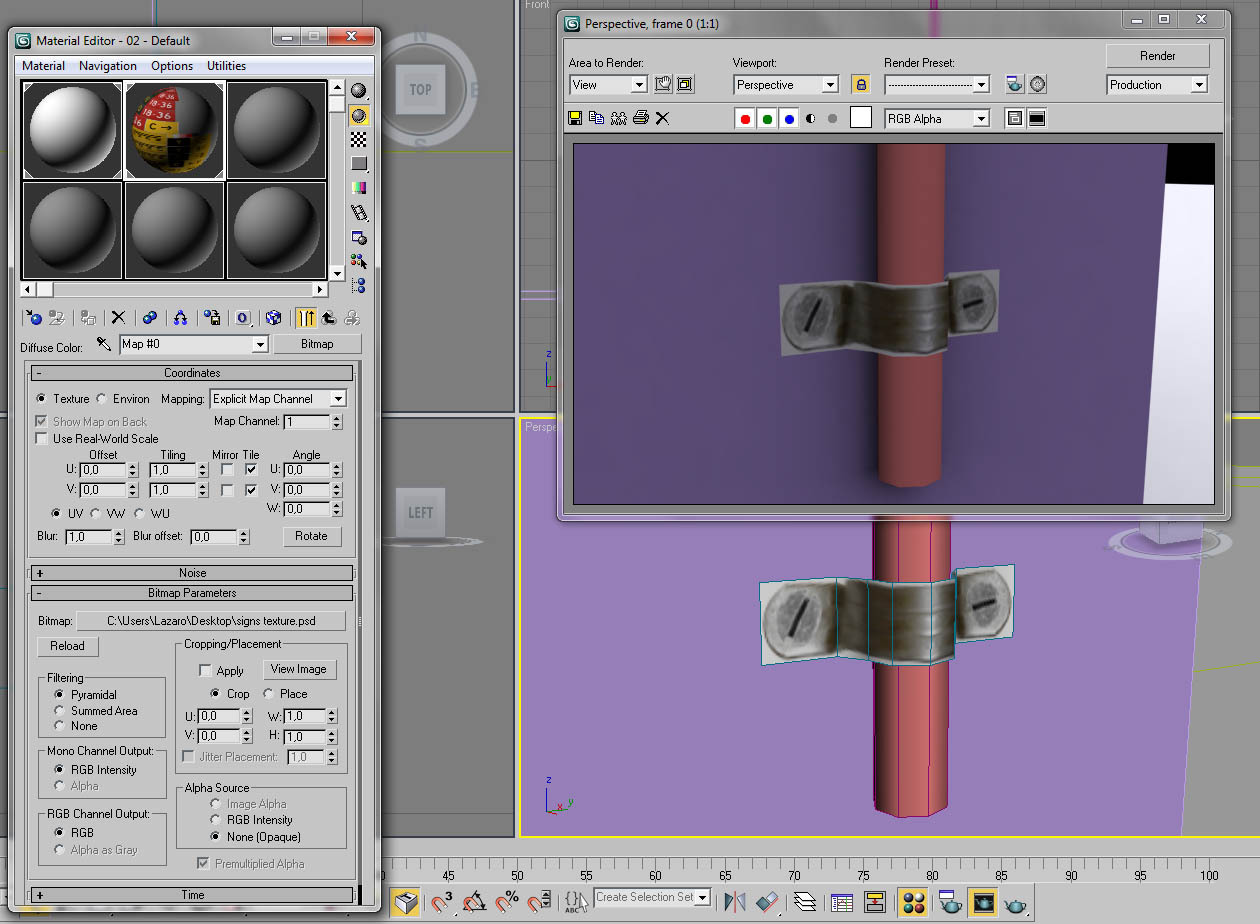
Ok, so here's the deal. I have a metal strap I modeled in low poly. I wanted to put a transparent texture on it to keep the poly's low. I usually put my .psd file in the diffuse slot of the material editor to preview my textures in Max before I convert them to .dds for the Sim.
Now In the viewport the transparent portion is not showing up correctly. The part that is supposed to be transparent is showing up white. Is there a way around this or do I have to live with it? It's not very good for previewing the final result and how it looks. Will it show up ok If I save that transparent .psd later on as a DXT5 .dds???
I put some screenshots below to help visualize.
Any help is appreciated. Thanks in advance.
problem_1fcf07.jpg


problem_2lsfm1.jpg
 
Taking a chunk out of the background won't make it transparent, it just makes a hole in the background :) . Click the Channels tab between Layers and Paths, click the icon just to the left of the garbage can icon to make a new channel, it'll be "Alpha 1" and probably black. Fill it with white, then select the rectangular area you removed from the background and fill it with black. Now Ctrl+click the clamp's layer in the layers pallette to load it's selection, go back to the channels pallette and fill the selected area with white. Save your .psd as DXT1 .dds.

Your alpha should look something like this, the black on the alpha controls the transparency:

alpha_clamp.jpg


In the Max material settings applied to the clamp scroll about halfway down and click "set default transparent", then Source Blend: SrcAlpha, Destination Blend: InvSrcAlpha, tick the Z-Test alpha tickbox, Alpha test level slider somewhere around 32 (maybe, you might have to experiment). Finally scroll down to extended parameters and make sure Z-write alpha is checked. Not sure you'll ever see this transparency in Max, you don't in gmax, it should work out in the sim though.

Alternately if you export your .mdl and then open it in MCX you can "set default transparent" there too. Your .dds texture with the alpha modification should be available to MCX so put a copy in the same folder the model is in, in MCX's material editor apply the "set default transparent" and it should pretty much nail all the settings without a lot of fiddling around.

Jim
 
If what you want to do is to preview the look in the 3dsmax viewport, you could use the map as Jim shows in the transparency channel. (some materials call it a cutout map)
 
Your going to do 4 times the work to keep the part a few poly's lower. And depending on your texture mapping your going to need a custom material editor assigned just for this part and you would have to create a custom alpha page. Not worth the work unless your making more than 100 of those parts. I would just create the part as it should be.

As far as I have learned in the latest version of FSXA poly count will not effect the simulator and of course it will effect your modeling program. Not sure what kind of project your doing but for aircraft we only use alpha for propellers and maybe 1 other item depending on the project. And for the rest of the parts we texture the entire part with no alpha involved. Less hassle!:idea:
 
Last edited:
Your going to do 4 times the work to keep the part a few poly's lower. And depending on your texture mapping your going to need a custom material editor assigned just for this part and you would have to create a custom alpha page. Not worth the work unless your making more than 100 of those parts. I would just create the part as it should be.

As far as I have learned in the latest version of FSXA poly count will not effect the simulator and of course it will effect your modeling program. Not sure what kind of project your doing but for aircraft we only use alpha for propellers and maybe 1 other item depending on the project. And for the rest of the parts we texture the entire part with no alpha involved. Less hassle!:idea:

I know that but it's an interessting technique that I would like to know how to use because I think I can apply it in other places aswell (fences, posts etc...)
Btw, I have to create that clamp 164 times :)
 
Delivery guy, makes a good point. I made a porch railing once and compared two designs, one with only 8 polys with transparency to simulate the individual posts, and one with hundreds of polys due to posts that I cloned many times. No discernible performance difference on a pretty dense airfield.
 
Yes, I'd have to agree. I suppose you could use the array function to clone your clamp 164 times, even if you couldn't cause array to position all the clamps where they need to be it beats going through Edit > clone 164 times so even if your array was just a row of 164 clamps that you had to position manually it would speed up the process considerably. Maybe Max has some magic tricks I don't know about and I'm letting my gmax mentality show. :)
 
Jim, his issue isn't placement in 3d space, he's just worried about poly count. Now that I've really looked at what he's doing, it makes even less sense, because his object is not planar. So, he doesn't have any hope for a single poly plane or anything like that, no matter how he deals with the outer shape (the only part impacted by transparency). I don't see how the transparency makes any real difference to polycount, perhaps a few at the end to allow the radius, but c'mon....no big deal.
 
Yeah Bob, I meant model the clamp, forget about the transparency, and clone it 164 times. The cloning problem of course doesn't change either way. ...and you're right, there would be very little savings in the poly count by going the transparency route.
 
Current clamp = 16 trigons
Clamp with rounded ends = 24 trigons

1/3rd more trigons isn't that much of an increase.
 
Back
Top