• Which the release of FS2020 we see an explosition of activity on the forun and of course we are very happy to see this. But having all questions about FS2020 in one forum becomes a bit messy. So therefore we would like to ask you all to use the following guidelines when posting your questions:

    • Tag FS2020 specific questions with the MSFS2020 tag.
    • Questions about making 3D assets can be posted in the 3D asset design forum. Either post them in the subforum of the modelling tool you use or in the general forum if they are general.
    • Questions about aircraft design can be posted in the Aircraft design forum
    • Questions about airport design can be posted in the FS2020 airport design forum. Once airport development tools have been updated for FS2020 you can post tool speciifc questions in the subforums of those tools as well of course.
    • Questions about terrain design can be posted in the FS2020 terrain design forum.
    • Questions about SimConnect can be posted in the SimConnect forum.

    Any other question that is not specific to an aspect of development or tool can be posted in the General chat forum.

    By following these guidelines we make sure that the forums remain easy to read for everybody and also that the right people can find your post to answer it.

Overlapping imagery tiles in a single BGL?

Rotornut44

Resource contributor
Messages
663
Country
us-florida
I have downloaded some high resolution imagery tiles from USGS for an island. This island runs from SW to NE, so the imagery within the tiles isn't perfectly square. (Cut into wedges and overlayed to make a clean fit) This means, when I combine these 90 something odd tiles into just 7 images, they have to overlap as they were not cut cleanly at the edge of the image. However, what was transparent in Global Mapper has now become a solid on export, making a clean overlap impossible without somehow making that part of the image invisible once again.

So, I guess the major question is, is it even possible to overlap tiles in a single BGL? I have already tried using a blendmask to exclude the solid areas, (Which I have also painted black) but either this method doesn't work, or you simply cant have overlapping tiles, because my resulting BGL was all kinds of jacked up..

Next on my list is trying NullValue to get rid of the black. I'm not sure how this will work. I'm really starting to think this is more of an overlap issue, but it seems unavoidable without major work to these tiles..

On the other hand, it also seems stupid to think that you couldn't overlap tiles in a single BGL..


-CB
 

Attachments

  • uneven_imagery_ps.JPG
    uneven_imagery_ps.JPG
    193.9 KB · Views: 456
  • photoreal_TMFViewer.JPG
    photoreal_TMFViewer.JPG
    187.6 KB · Views: 467
CB, I don't know exactly what steps are needed to fix this completely but having taken 24 USGS tiles down to 6 and then resampling them into a bgl I will offer the following advice. I would use GDAL Merge to combine the original 90 plus tiles into 7. This will combine the tiles and preserve the Geo part of the original GeoTiff tiles. You don't say whether or not the tiles were reprojected although it looks like they were due to the saw tooth edges of the image. I would first combine the tiles into 7 and then reproject them with GDAL Warp. Finally resample will handle images that overlap. My opinion is that it places image data by location. The first image file that is read for a given location is written to the bgl. Then any more image data that is read from another source file for the same location is ignored. Once again that resample works this way is just my opinion, but resample will combine source files that overlap. Below is my image bgl.
Ed
AtlImage.jpg
 
Ed, yes, the image(s) included above have been combined in global mapper, then reinserted and reprojected. Prior to reprojection, the images fit flush. With reprojection, they haven been sliced at an angle. I could try to reproject them in GDAL (As I kept the original un-reprojected 7 images) but would it be any different than doing so in Global Mapper? The resulting reprojected images would still be sliced at an angle right?

My second attempt last night also ended in utter failure. As much as I want to believe, logically, that it should work, it just doesn't seem like you can overlay imagery like this in a single BGL.. (I say like this, because I'm sure I have done it before, but its just something about these odd tiles) The only other solution I can think of at the moment is to import those images, reproject them, then use the digitalizer tool to slice them up. (so that the edges are clean-cut)

-CB
 
Last edited:
Yes reprojecting the 7 images in GDAL Warp would also give you the images sliced at a angle. Once I reprojected my 6 tiles I had only two issues to correct. One was GDAL Warp in reprojecting one of the images actually put some image data outside of the canvas. Resample left the remaining space blank. I corrected this by using the ts parameter and defining the size of the output image canvas as one pixel larger in both dimensions. The second problem I had was the angled image data did not perfectly match with the adjoining image and resample left these pixels as blank. I fixed this by adding one pixel to each section of image data on one of the images. The only suggestion I can give you is that from your second jpg it looks like resample doesn't have the correct geo location for the section of image that is on the upper left but should be on the bottom.

Ed
 
Hi,

while it is still a bit unclear to me where and why exactly your problems occur, I can offer the following steps to make sure there is no overlap or black areas between tiles.

1. Import all the tiles into Global Mapper
2. Export the entire image, un-reprojected to a single file
3. Import the file, reproject
4. Export a square area, and use the tiling options if necessary

It furthermore is always a good idea to ensure the 'make background/void pixels transparent' box is ticked. Perhaps that is why the black areas appear :scratchch
 
Last edited by a moderator:
TBH I can't get my head around the question, but with GlobalMapper you should be able to load all the tiles, make any blank areas invisible, reproject and then export as a GeoTIFF completely ready for Resample... i.e. without saving any intermediate files. I can provide instructions if needed...?
 
I can provide instructions if needed...?

I am always eager to hear other people's workflow, so at least for my interest's sake, please do!

To clarify the reason I proposed an intermediary file, was to make absolutely sure there are no more troubles, in my view, my steps above provide a fail-safe method ;)
 
Last edited by a moderator:
2. Export the entire image, un-reprojected to a single file

With over 90 15cm tiles at 10000x10000px each, I'm pretty sure this would blow up my computer. Not to mention, I think this would exceed the maximum capacity of a TIFF file. :laughing:

It furthermore is always a good idea to ensure the 'make background/void pixels transparent' box is ticked. Perhaps that is why the black areas appear :scratchch
Just to clarify, the background was already solid on export. I just painted it black to make it easier to exclude.


TBH I can't get my head around the question, but with GlobalMapper you should be able to load all the tiles, make any blank areas invisible, reproject and then export as a GeoTIFF completely ready for Resample... i.e. without saving any intermediate files. I can provide instructions if needed...?

These are my steps taken..

1. I imported the 90 something tiles into Global Mapper.
2. I selected an "X" amount of tiles, which I combined into areas that I could work with, cutting down the # of files to 7. (I forgot to reproject my tiles at this point)
3. Realizing this, I then reimported my 7 combined images and reprojected to Geographic (Lat and Long) and WGS84. (This is where the slices appeared)
4. Since my GeoTIFF background was now solid from export, I painted the sandy background color black so that it would be a flat, single solid color that I could exclude either via blendmask or NullValue.
5. At first I opted to try using a blendmask, but my final result is shown in the last image of the OP.

-CB

Edit: Standby. I made a few changes to the INF file that changed the # of cells considerably. Currently awaiting results..
 
No 3. is suspect... no "slices" should appear. Something isn't correct in GM...

Well. I'm not sure what to say. They are definitely there once I export the sections. Not sure what I could be doing wrong, as everything seems pretty straight forward. And by slices, refer to image 1 of the OP.
When I reproject the images, they are reorientated slightly, (rotated) which causes their once flush sides to sheer. Since an image must be square, the remainder of the square overlaps the other image while the sheered slices fit together. (Although this part is transparent in Global Mapper. It becomes a solid on export.)

-CB
 
Ok. The BGL finally finished compiling.. After changing the X and YDim settings in the INF to match that of the SDK documentation for 15cm, my tiles are now the proper size and closely aligned. However, there is still a large gap in between the tiles. I have checked the coordinates for both images and everything seems to be correct. Even Global Mapper still shows them perfectly aligned. Even so, resample still doesn't like something..
 

Attachments

  • imagery_gap_TMFViewer.JPG
    imagery_gap_TMFViewer.JPG
    126.7 KB · Views: 369
When selecting tiles for export, I would use the tiling function in the export window, rather than selecting original tiles via the overlay control centre, which is what I presume you did. If you reproject, then select the original tiles, you will have skew edges and overlapping areas.

On a seperate note, there's always the bigtiff format for large images, if you ever feel the need to use it :)
 
Hi Christopher:

I believe you may be able to achieve your goal more easily by using the work-flow suggested above by Spitz:

http://www.fsdeveloper.com/forum/th...ery-tiles-in-a-single-bgl.439020/#post-761138


Be assured that the "Tiling" options he refers to in Global Mapper (aka "GM") may still be used to segment GM's output into the ex: 7 GeoTiff files you seem to want.

(I presume that you prefer to segment GM's output into 7 smaller GeoTiff files so that they will be more manageable for editing in PhotoShop, and due to the 2-GB BGL size limitation of FS SDK Resample).


IMHO, the "gaps" you have reported appear likely due to Geo-rectification and/or decimal coordinate imprecision issues arising from the work-flow you used; it is less likely to occur if you use the sequencing Spitz suggested above.


CAVEAT
: Be aware that you must save Geo-rectification data for each GeoTiff file BEFORE editing in PhotoShop, and restore it back into the "Tiff" file AFTER editing in PhotoShop, ...or it will no longer be a "GeoTiff" file.


Also, you must NOT change the total number of Rows and Columns in the pixel dimensions of the original GeoTiff image when edited within PhotoShop ...or it will no longer be spatially "Georeferenced" to the coordinates that you originally had for that aerial imagery file.


Be aware as well, that the Geo-referencing Geographic coordinates may change when aerial imagery files are re-projected. :pushpin:


As you may know, GM can open a USGS ZIP file directly, but one may instead opt to extract the ZIP into a folder, then browse to the aerial imagery GeoTiff and open it directly (without loading the other non-GeoTiff files included within the internal folder structure of the original USGS ZIP files).


Once all desired ZIP-ped data files are opened in a GM "workspace" session, save that workspace *.GMW file under a easily-recognizable name.

Then, in GM Menu > Tools > Configure... > {Projection Tab}, set that workspace projection to Geographic (Lat-Lon) / WGS84.


Then, (and IMHO, only then) ...one may more efficiently and successfully, export properly projected and Geo-referenced segments or "tiles" of the aerial imagery into the desired GeoTiff coverage areas / sizes for use as source files by FS SDK Resample without the issues you reported above.


If you intend to NOT save the GeoTiff Geo-rectification info BEFORE editing in PhotoShop, and if you intend to NOT restore it back into the "plain Tiff" files which are output AFTER editing in PhotoShop, but rather you intend to utilize the Metadata from the Layer Control Center dialog in GM for the FS SDK Resample *.INF file parameter values, this "could" work IF you are careful to NOT re-size the edited "*.Tif" file by adding / deleting any Rows / Columns of pixels from the pixel dimensions of the original Geo-Tiff file (...as listed within the Metadata accessed from the Layer Control Center dialog in GM).


FYI: If by any chance you may be hesitant to go back and re-download any of the (lost or irretrievably altered ?) original 90 -to- 100 source data files via the USGS / NASA EarthExplorer online portal, the data is also available via the NC GIS portal (although IMHO that ArcGIS-based GUI is even more of a P.I.T.A.).


But, in many cases (and the location of your project area is such a case), one can discern the direct USGS server download links for the 15cm aerial imagery ZIP files, and simply re-download them via one's web browser (...or better yet, a non-USGS 3rd party internet download accelerator with a 'bulk' file list feature). ;)


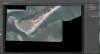
With a little research via loading and display in GM of the SHP file containing file names for local aerial imagery tiles included in one of the USGS ZIP files for the above project area, you can manually re-compose a list of URLs for the 90 -to- 100 discretely-named / sized USGS online server ZIP archive files covering the approximately 7-mile radius surrounding Okracoke Island airport ...by extrapolating from this example base URL (for the tile showing the greater portion at the North end of the airport): :idea:

https://dds.cr.usgs.gov/pub/data/hro/3647541_OC6I037000209500022012


BTW: One will not see the 15cm imagery at its full resolution at in-flight altitudes, and will instead only see lower MIPMAPs / lower LODs of the custom photo-real aerial imagery when not in close proximity to the ground at Okracoke Island airport, so there is IMHO, no need to put all LODs into every < huge ! :yikes:> BGL for the areas in between or surrounding such airports, as the highest MIPMAP / LODs will only be seen in FS at lower altitudes and/or while on the FS ground itself. :alert:


Thus, depending on what you intend to do with water masking and blend masking for your custom photo-real land class made via FS SDK Resample, you may wish to consider the work-flow suggested by Holger Sandmann in a recent post ...here: :teacher:

http://www.fsdeveloper.com/forum/th...ith-different-resolutions.438961/#post-760580

[EDITED]

...and here:

http://www.fsdeveloper.com/forum/threads/photoreal-lod-priority-issue.437050/#post-741043


http://www.fsdeveloper.com/forum/threads/lods-for-high-resolution-photoreal.436785/#post-738370


PS: I see that you have previously been successful implementing use of multiple custom photo-real aerial imagery BGL's with differing LODs in each BGL that is mapped to overlay the same Geographic coverage extents on the ground, so you may also consider utilizing that option via the Resample "LOD" [Destination] output Parameter value (since your 15cm source data derived FS SDK Resample BGL sizes will still be rather large for this project area):

http://www.fsdeveloper.com/forum/threads/lods-for-hi-res-photoreal.435132/


...subject to this cautionary note by ACES for numerous files overlapping the same Geographic extents:

https://msdn.microsoft.com/en-us/library/cc707102.aspx#PerformanceTipsforAerialImagery


Some additional links to explore for the latter 'separate LODs per BGL' option:

https://www.google.com/#q=site:www.fsdeveloper.com+Resample+Split+LOD


[END_EDIT]


Hope these ideas help with your project ! :)

GaryGB
 
Last edited:
Do you get the same "slices" when you re-load the tiles into GM (having unloaded all beforehand)?

Which site did you download the imagery from?
 
Last edited:
How did I miss these posts? I decided to sit down and have a look at these files again this evening after a while of tinkering with smaller sceneries. Gary, as always, thanks for the immense amount of help and resources. You are a book of knowledge.

Anyways, I gave the tiling tip a shot. I'm actually not sure why I didn't try that before. I guess I wasn't 100% sure about what it did exactly, but a little investigating turned up some positive results. I just finished reexporting my tiles using this tiling feature. After reloading them into Global Mapper, I'm not noticing any issues. However, I think I may play around with the tiling bounds a bit more first. My current settings produced 14 TIFF's. I'd like to see that number a bit smaller. Makes aligning masks a bit easier.

Once I get the numbers right, I'll pop them into PhotoShop and have a closer look.

-CB
 
Back
Top