Hi John:
Not wishing to make you work too hard in seeking 'quick' answers, here are some pertinent threads, some (most) of which you instigated:
") https://www.fsdeveloper.com/forum/t...t-which-displays-as-an-emissive-light.455166/
https://www.fsdeveloper.com/forum/threads/how-to-get-night-lightning-in-a-nice-way.458800/
https://www.fsdeveloper.com/forum/threads/airport-name-signage-with-lights.458162/
https://www.fsdeveloper.com/forum/t...-sign-glow-in-daylight-msfs2020.460632/page-2
https://www.fsdeveloper.com/forum/t...t-which-displays-as-an-emissive-light.455166/
https://www.fsdeveloper.com/forum/threads/how-to-get-night-lightning-in-a-nice-way.458800/
https://www.fsdeveloper.com/forum/threads/airport-name-signage-with-lights.458162/
https://www.fsdeveloper.com/forum/t...-sign-glow-in-daylight-msfs2020.460632/page-2
Dick's valuable collection of posts on FS lights deserve a listing all their own:
 https://www.google.com/search?q=asite:+www.fsdeveloper.com+rhumbaflappy+MSFS+punctal+light&client=firefox-b-1-d&hs=lsM&sca_esv=089c91361eed6c29&biw=1200&bih=586&ei=awfdac65JLCYptQPpv6YgAo&ved=0ahUKEwiOm-aTjuuTAxUwjIkEHSY_BqA4ChDh1QMIEQ&uact=5&oq=asite:+www.fsdeveloper.com+rhumbaflappy+MSFS+punctal+light&gs_lp=Egxnd3Mtd2l6LXNlcnAiOmFzaXRlOiB3d3cuZnNkZXZlbG9wZXIuY29tIHJodW1iYWZsYXBweSBNU0ZTIHB1bmN0YWwgbGlnaHQyBRAAGO8FMgUQABjvBTIFEAAY7wUyBRAAGO8FMggQABiiBBiJBUjna1CBDFiNYXABeACQAQGYAbcBoAGTGaoBBTIyLjEyuAEDyAEA-AEB-AECmAIGoALVBMICCBAAGIAEGKIEwgIIECEYoAEYwwSYAwCIBgGSBwMyLjSgB_dJsgcDMi40uAfVBMIHAzAuNsgHCYAIAA&sclient=gws-wiz-serp
Most of the above threads deal with directional "light" emitted in 'visible' patterns (beams, cones, etc.) from illuminated objects.
IIUC, your OP above seeks a way to create a:
*
_LM suffix, "LightMap" (FS2Kx)
...or:
*
_emis suffix, "Emissive" (MSFS) texture Material using the MSFS SDK Day / Night switch.
In that scenario we do not even need to see
any light beams, cones, etc., as surfaces on 3D objects of interest are just 'illuminated' at night.
AFAIK, this would involve a simple "
Emissive Map as the
Emissive texture" via Material attributes:
 https://docs.flightsimulator.com/ht...rframe/Texturing/Lights.htm?rhhlterm=Emissive
An additional consideration is use of Emissive Elements with Emissive Textures for decals.
https://docs.flightsimulator.com/ht...ling/Cockpit/Texturing/Emissive_Materials.htm
"This means that you will need to have an emissive texture as part of the decal texture."
"
NOTE: The emissive map is a separate texture that should have the same name as the albedo texture,
...except it should be suffixed with '
_emis' instead of
'_albd'.
Bearing in mind that Decals may be regarded as "Translucent Elements":
https://docs.flightsimulator.com/ht...ng/Cockpit/Texturing/Translucent_Elements.htm
"
TRANSLUCENT ELEMENTS
Within the cockpit and cabin you will have various elements that require translucent materials (glass or plastic coverings, sun visors, etc...). This page outlines recommendations for creating these elements.
Some general notes on these elements:
- In some case it may be better to have translucent objects as separate objects to avoid flickering when they overlap each other on the screen.
- Object rendering is sorted from back to front using the mesh center. As such, it's more convenient to have each transparent part as a separate object for the sort to work correctly. Note that by mesh center we mean the actual mesh bounding box center, not the pivot position (pivot position does not affect the draw order sort algorithm).
The Glass Material
The material used for translucent/transparent elements is the
Glass material preset. Do
not use the Windshield preset for anything other than the windshield itself (explained
here), as then you'll get rain/ice effects on your transparent surfaces!
To set up the glass material you need to do the following:
- Create a new FlightSim material
- Call it "GLASS" - or some other appropriate name - and set the Material Type to Glass as well
- Set the alpha of the Base Colour to 0.01
- Set the Roughness to 0.0 and the Metalness to 0.0
- Set the Alpha Mode to BLEND
It should be noted that both Glass and Windshield materials are rendered in the same layer by the engine, and you can have any number of glass materials overlapping on screen without them masking each other. However, you may experience flickering when multiple transparent (and decal) material types are layered on top of each other in the rendered output. In these cases you can change the
Draw Order value:
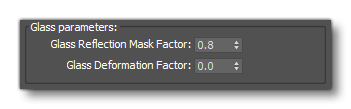
Finally you can use the following two values to modify the way that the glass looks in the simulation:
- You can change the cubemap reflection by changing the value for the Reflection Mask Factor
- You can add imperfections in the glass quality by using the Glass Deformation Factor (good for gauge covers, for example)"
=rk= submitted this example for a Decal:
https://www.fsdeveloper.com/forum/threads/airport-name-signage-with-lights.458162/post-922049
However, Dick offers this practical clarification to a workflow for a simple 'Standard Emissive' object
not rendered as an aircraft gauge / Decal:
https://www.fsdeveloper.com/forum/threads/airport-name-signage-with-lights.458162/post-922065
Not sure why you are using Decal. Standard gives you control of the Day-Night cycle, which you might want. You can use an emissive color or a PBR Emissive texture. You might also want to make the colored text faces assigned as a separate mesh. Then controlling the color and emission is a bit easier.
GaryGB


")